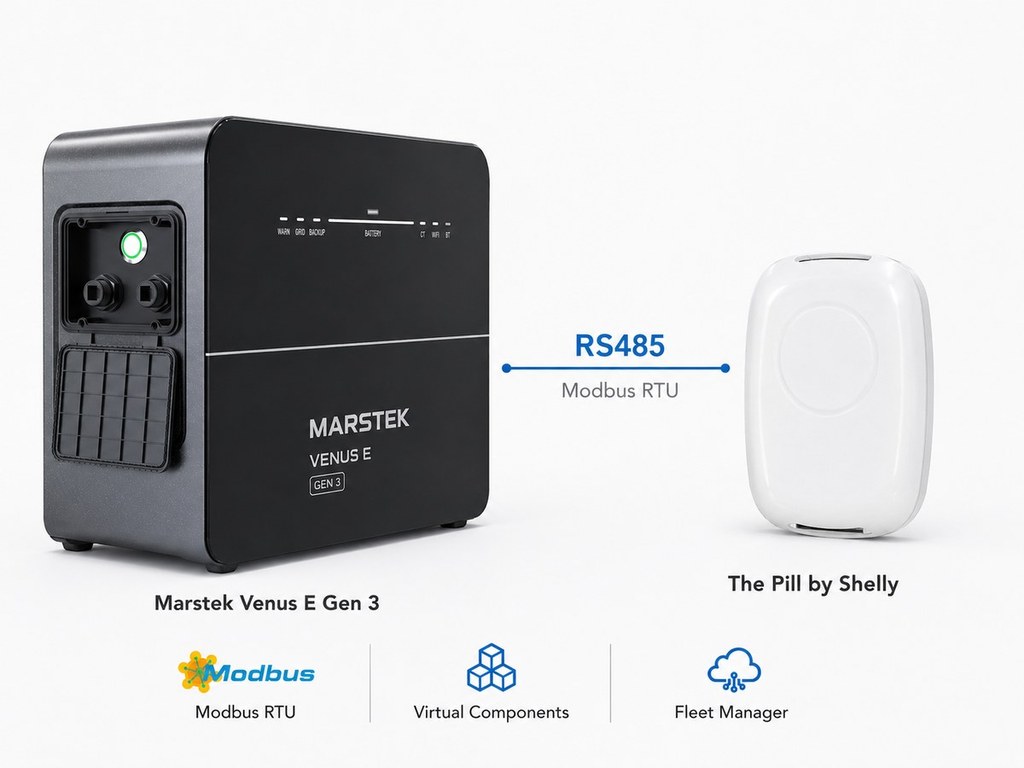
The Marstek Venus E balcony battery exposes live battery and AC data over its RS485 (Modbus RTU) port. This guide shows how to bridge it into the Shelly ecosystem using The Pill by Shelly, its Modbus RS485 Add-on, a JS Modbus-reader script, and Shelly Virtual Components.
System Overview
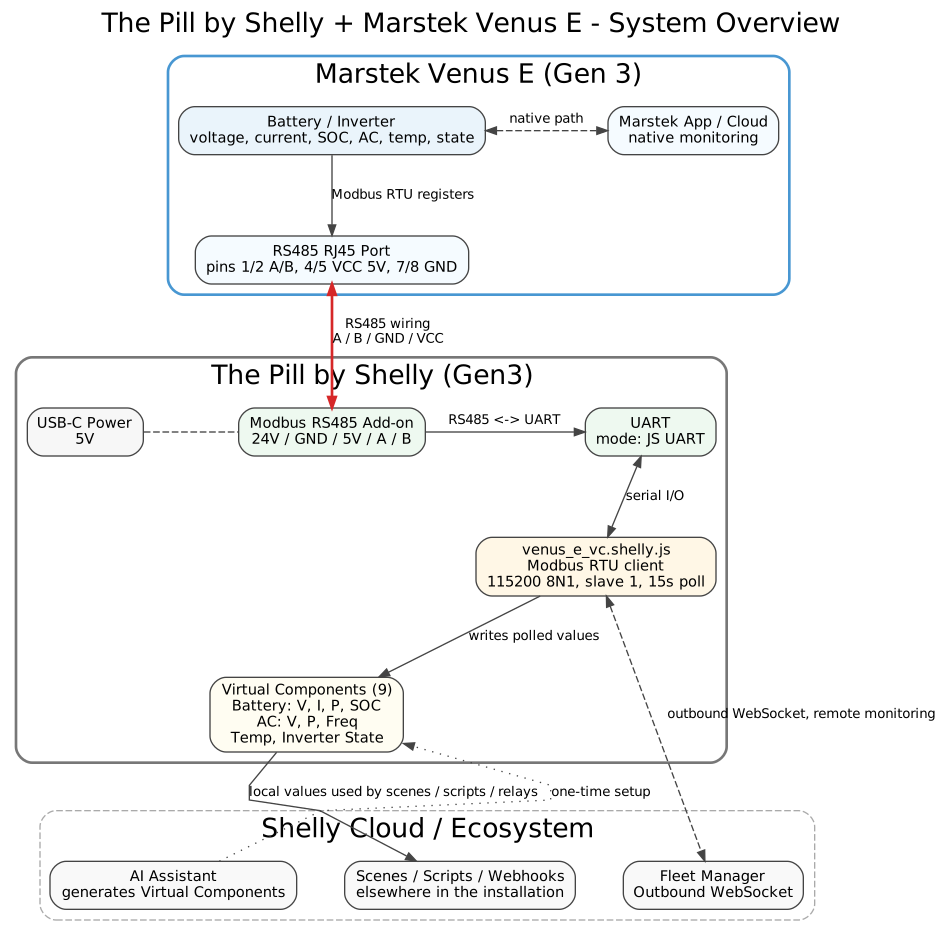
The Venus E keeps its own native path through the Marstek app and cloud untouched. In parallel, its RS485 port feeds Modbus RTU data to The Pill, where a JS script polls the registers over UART and writes them into Virtual Components. Those components are visible locally, reachable remotely through Fleet Manager's outbound WebSocket, and usable like any other Shelly value in scenes, scripts, and webhooks elsewhere in the installation.
The Pill by Shelly is a small USB-C powered Wi-Fi/Bluetooth device built to bridge low-voltage peripherals and serial devices into the Shelly ecosystem. With its JS UART operating mode and the Modbus RS485 Add-on, it can poll a third-party Modbus RTU device directly and republish the values as Virtual Components — Shelly-native entities that behave like any other Shelly sensor for monitoring, scenes, scripts, and Fleet Manager dashboards.
The Marstek Venus E Gen 3 is a plug-in balcony battery with dual RJ45 ports (RS485 and Ethernet) for wired communication with the home energy system. That RS485 port is the integration point used here.
What You Need
-
Marstek Venus E (Gen 3) balcony battery
-
Marstek app, for initial battery setup and its own native monitoring
-
Shelly Pill (Gen3)
-
Shelly Modbus RS485 Add-on for The Pill
-
The Pill firmware
1.8.99-dev152568 -
A Shelly Fleet Manager instance, for remote management and monitoring
-
The [Marstek Venus E MODBUS Virtual Components script](https://github.com/ALLTERCO/shelly-script-examples/blob/main/the_pill/MODBUS/Marstek/VenusE/venus_e_vc.shelly.js)
Set Up the Venus E
-
Unbox the Venus E and complete the normal first-time setup.
-
Install the Marstek app and pair the battery, so the battery has its own
monitoring and configuration path independent of Shelly.
3. No extra Modbus-specific configuration is required on the Venus E side —
the RS485 RJ45 port exposes Modbus RTU registers once the battery is powered and initialized through the app.
Wire The Pill to the Venus E
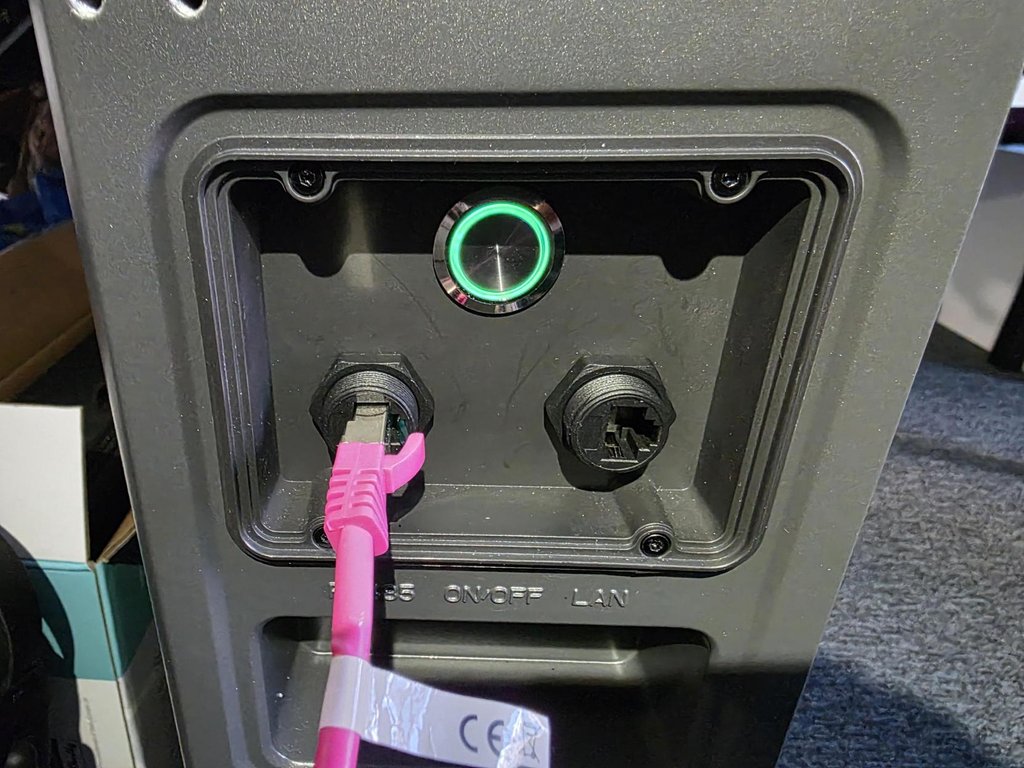
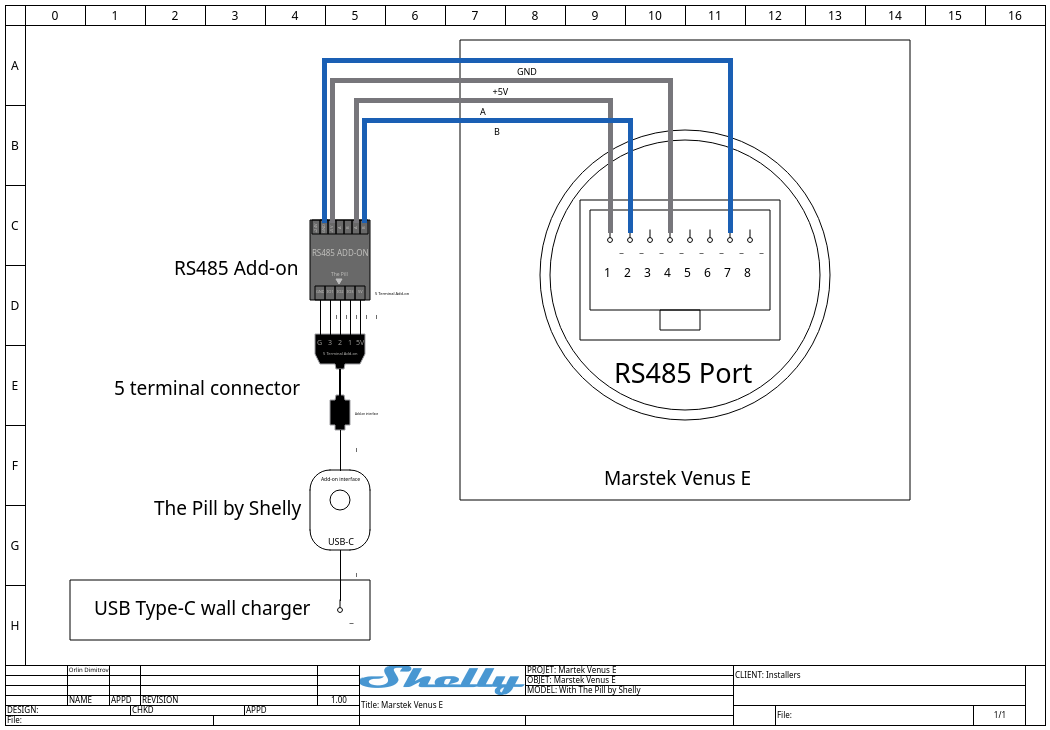
The Venus E exposes RS485 on a dedicated RJ45 port on its back panel, next to its ON/OFF button and its Ethernet (LAN) port.
Marstek's RJ45 (male, 8-pin) pinout for that port:
| Pin | Signal |
|---|---|
| 1 | RS485_A |
| 2 | RS485_B |
| 3 | NC |
| 4 | VCC (5V) |
| 5 | VCC (5V) |
| 6 | NC |
| 7 | GND |
| 8 | GND |
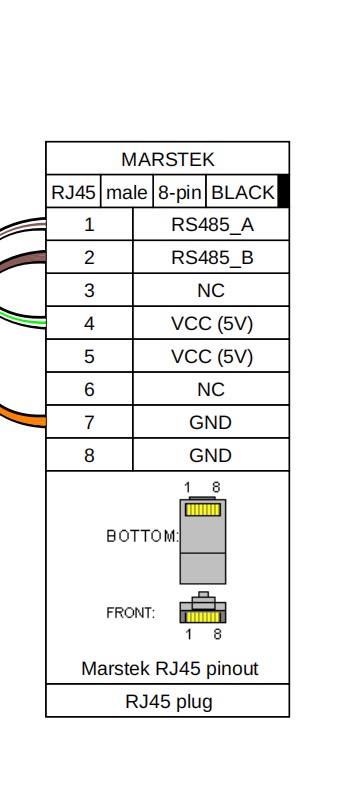
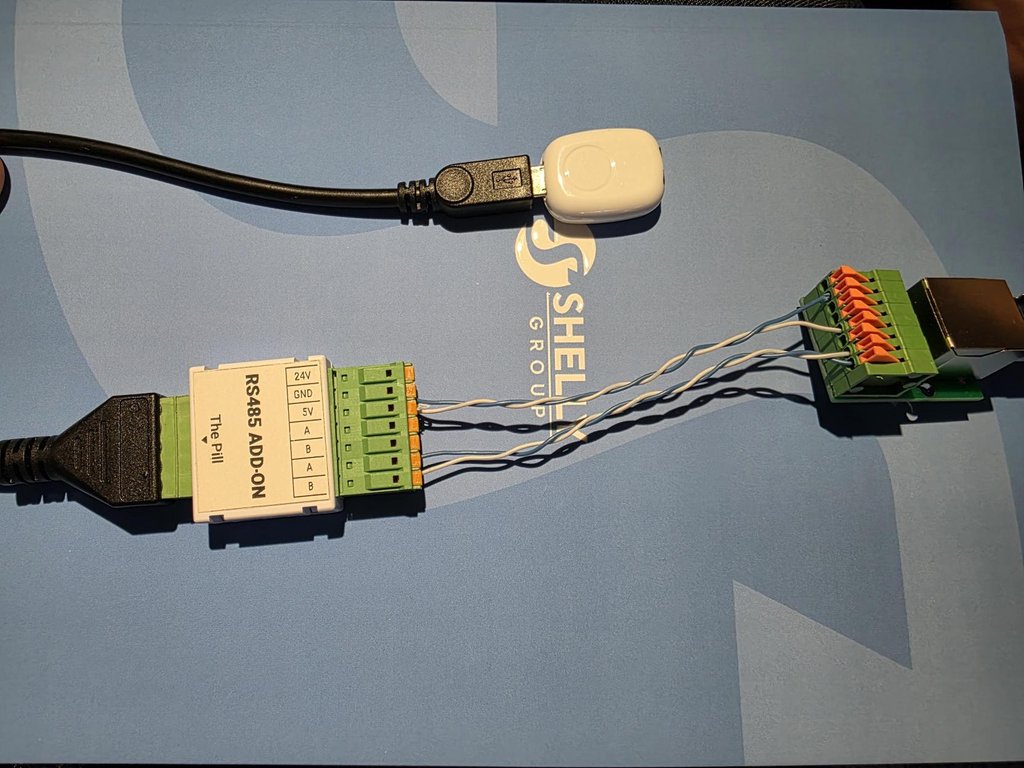
The Modbus RS485 Add-on breaks out to a terminal block with 24V, GND, 5V, and two A/B pairs (the second pair is for daisy-chaining additional RS485 devices). Wire the Add-on's GND, 5V, A and B terminals to the Venus E's RJ45 pins 7 or 8 (GND), 4 or 5 (VCC), 1 (RS485_A) and 2 (RS485_B).
-
Attach the Modbus RS485 Add-on to The Pill.
2. Wire the Add-on's GND, 5V, A and B terminals to the matching Venus E
RJ45 pins above.
3. Power The Pill over USB-C.
Configure The Pill
-
Update The Pill to firmware
1.8.99-dev152568.
2. Set the Serial/UART component's operating mode to JS UART, so the
port is driven by the script rather than a fixed built-in mode.
3. Configure the Outbound WebSocket component to point at the Fleet Manager
instance, so the device can be managed and monitored remotely.
Create the Virtual Components
The script expects a group Virtual Component and nine number Virtual Components underneath it — one per value read from the Venus E. Rather than creating these by hand, use The Pill's built-in AI Assistant: describe the components you need (battery voltage, current, power and state of charge; AC voltage, power and frequency; internal temperature; inverter state), and it generates the matching Virtual Components automatically.
Install and Run the Script
-
Open Scripts on The Pill and add a new script.
2. Paste in the contents of
[venus_e_vc.shelly.js](https://github.com/ALLTERCO/shelly-script-examples/blob/main/the_pill/MODBUS/Marstek/VenusE/venus_e_vc.shelly.js).
3. Enable and start the script.
The script opens a Modbus RTU session over UART and polls the Venus E every 15 seconds:
| Setting | Value |
|---|---|
| Baud rate | 115200 |
| Mode | 8N1 |
| Slave ID | 1 |
| Response timeout | 1000 ms |
| Inter-request delay | 80 ms |
| Value | Register | Type | Scale |
|---|---|---|---|
| Battery voltage | 32100 | u16 | 0.01 V |
| Battery current | 32101 | s16 | 0.01 A |
| Battery power | 32102 | s32 | 1 W |
| Battery SOC | 32104 | u16 | 1 % |
| AC voltage | 32200 | u16 | 0.1 V |
| AC power | 32202 | s32 | 1 W |
| AC frequency | 32204 | u16 | 0.1 Hz |
| Internal temperature | 35000 | s16 | 0.1 °C |
| Inverter state | 35100 | u16 | — |
The script is read-only: it polls these nine registers and writes the results into the Virtual Components, without writing any control registers back to the Venus E.
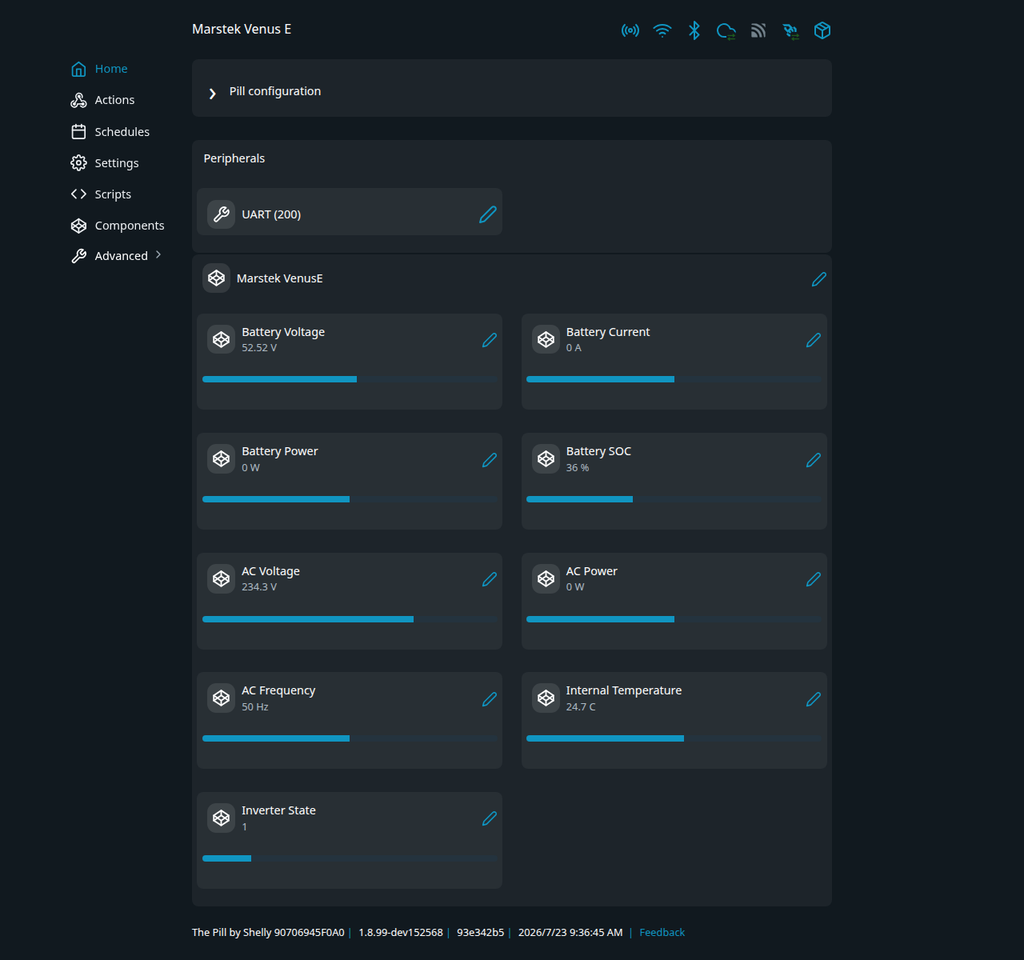
After a successful install, The Pill's Home page shows a Marstek VenusE group with all nine Virtual Components populated with live values:
What This Enables
Once the Venus E's battery and AC values live as Shelly Virtual Components, they behave like any other Shelly sensor:
-
Monitoring — battery SOC, power flow, and temperature are visible
-
locally through The Pill and remotely through Fleet Manager, independent of the Marstek app and cloud.
-
Automation — the same values can drive Shelly scenes, scripts, and
-
webhooks elsewhere in the installation, for example switching a Shelly relay load on or off based on Venus E battery SOC or AC power.
Confirmed in Testing
On a real Pill + Venus E installation, the following was verified:
-
Modbus RTU read over UART between The Pill and the Venus E works.
-
The nine Virtual Components display the polled values correctly.
-
Fleet Manager Outbound WebSocket connectivity is confirmed.
-
The AI Assistant successfully generated the required Virtual Components.
Resources
-
[The Pill by Shelly — technical documentation](https://shelly-api-docs.shelly.cloud/gen2/Devices/Gen3/ThePill/)
-
[Modbus RS485 Add-on for The Pill](https://www.shelly.com/products/modbus-rs485-add-on-accessory-for-the-pill-by-shelly)
-
[Marstek Venus E Gen 3](https://eu.marstekenergy.com/en-eu/products/marstek-venus-e-gen-3)
-
[Venus E Virtual Components script](https://github.com/ALLTERCO/shelly-script-examples/blob/main/the_pill/MODBUS/Marstek/VenusE/venus_e_vc.shelly.js)
-
[Shelly Fleet Manager](https://fleet.shelly.com/)