Summary
This solution securely connects a Shelly IP device to RabbitMQ via the MQTT plugin using mutual TLS (mTLS), no passwords, using certificate-based mutual authentication. A single Bash script installs and configures RabbitMQ, generates a private CA, server and client certificates, and then presents a table of configuration values. After it finishes, the only manual step on the Shelly is to upload ca.crt, client.crt, and client.key, copy those values into the MQTT settings, and save it. Supports RabbitMQ series selection (--rmq-series 3.13|4.0|4.1, default 4.1) from Team RabbitMQ’s Ubuntu noble repos and forces TLS 1.2 only. On 4.x, the MQTT client_id is enforced from the certificate SAN (URI) while the authenticated username still comes from the certificate CN; on 3.13, SAN->client_id binding isn’t available. You can control the connect host (and the server cert CN/SAN) via --connect-dns / --connect-ip. The script exports device certs to /etc/mqtt-cert and, by default, also issues a monitor cert (/etc/mqtt-cert-monitor with tarballs in /tmp/.
Result: encrypted, certificate-authenticated MQTT with least-privilege topic access.
Link to the script here.
Important: This script is for development/testing only, an example of what’s possible. Use with care and do not deploy as is to production.
Architecture
[Shelly device] | | MQTT over TLS (mTLS) - port 8883 v [RabbitMQ MQTT listener] ---> [amq.topic exchange] ---> [queues/subscriptions] | | | ‘-- topic ACLs scoped to your MQTT prefix | ‘-- Management UI (HTTPS, 15671) -
Transport: Shelly talks to RabbitMQ on 8883 (MQTTS). TLS is required; clients must present a valid certificate (mTLS), it forces TLS 1.2 only.
-
Identity: The device’s certificate CN maps to a RabbitMQ user (no username/password in Shelly).
-
Client ID binding: Enforced from certificate SAN (URI) on RabbitMQ 4.x . Username still comes from CN; 3.13 doesn’t support
SAN→client_id. -
Authorization: Topic ACLs restricted to your chosen MQTT prefix (plus read only shellies/command for compatibility).
-
Tenancy: MQTT doesn’t carry vhosts, so connections are routed to a dedicated vhost (e.g., /shelly) via mqtt.vhost.
-
Management: HTTPS UI on 15671.
-
Plain ports: Disabled by default. You can temporarily keep 1883/15672 with --keep-plaintext during migration.
Quick reference
| Concern | Decision |
|---|---|
| Port (data) | 8883 / TCP (MQTTS with mTLS) |
| Port (admin) | 15671 / TCP (HTTPS Management UI) |
| Identity | Cert CN -> RabbitMQ user |
| Client ID | User-provided in Shelly; on RabbitMQ 4.x it’s enforced from the cert SAN (URI). On 3.13, |
| Vhost | /shelly (set via mqtt.vhost) |
| Topics | Restricted to your MQTT prefix (both slash and dot forms) plus read-only |
| Secrets on device | Client key only (no passwords) |
| Plaintext | Off by default; opt-in with --keep-plaintext |
| TLS Version | TLS 1.2 only |
Prerequisites
-
Tested environment (time of writing):
Ubuntu 24.04 LTS (amd64),RabbitMQ 4.1(installed via this script), Shelly firmware1.7.1. -
Install: from Team RabbitMQ repos pinned to Ubuntu noble.
-
Access: Shell on the host with sudo privileges; outbound internet for apt repos.
-
Addressing: Stable broker
IP/DNS(script can auto-detect, fixed is better). -
Time sync: NTP enabled (cert validity depends on correct time).
-
Optional:
mosquitto-clientsfor quick end-to-end testing.
What the script does
-
Install RabbitMQ (3.13 / 4.0 / 4.1) + matching Erlang on Ubuntu 24.04
Uses Team RabbitMQ apt repos (the current recommended path) to get modern Erlang/RabbitMQ. https://www.rabbitmq.com/docs/install-debian
-
Configure via rabbitmq.conf (not rabbitmq-env.conf)
Runtime settings (listeners, TLS, plugins) live in
rabbitmq.conf;rabbitmq-env.confis only for environment variables. https://www.rabbitmq.com/docs/configure -
Enable MQTT + Management plugins
Turns on native MQTT support and the HTTPS management/UI and enables
rabbitmq_auth_mechanism_ssl. https://www.rabbitmq.com/docs/mqtt-
Enable
detailed_queues_endpointfeature flag(UI only detail for Queues).
-
-
Enforce mutual TLS (mTLS) for MQTT
Sets
ssl_options.verify = verify_peerandssl_options.fail_if_no_peer_cert = trueso clients must present a valid cert; forces TLS 1.2 only. https://www.rabbitmq.com/docs/mqtt#tls -
Passwordless cert login (CN → user)
Enables
mqtt.ssl_cert_login = trueandssl_cert_login_from = common_name. The mapped user must exist in RabbitMQ (no password needed). https://www.rabbitmq.com/docs/mqtt#tls-certificate-authentication -
Bind MQTT client_id to the certificate SAN (URI)
On RabbitMQ 4.1, sets
mqtt.ssl_cert_client_id_from = subject_alternative_name so the CONNECT client_id must match the cert SAN (prevents ID spoofing). https://www.rabbitmq.com/docs/mqtt#usage-of-client_id-extraction-from-client-certificates-for-authentication
This binds client_id to the cert SAN (URI). Username still comes from CN; if you want username from SAN instead, you’d switch to ssl_cert_login_from=subject_alternative_name and ssl_cert_login_san_type=uri in the config.
-
Issue two client certs (same CN, different SANs)
-
device:
SAN=URI: -
monitor:
SAN=URI:-mon -
Certificate profiles: CA RSA-4096; server/client RSA-2048; leaf validity ≈ 825 days
-
Lets you subscribe with the monitor cert without disconnecting the device (distinct client IDs).
-
Lock down listeners & ports
-
MQTTS:
8883 -
Management (HTTPS):
15671 -
Plain 1883/15672 off by default; optional during migration with --keep-plaintext. https://www.rabbitmq.com/docs/networking
-
-
Create tenancy & permissions
-
Routes MQTT sessions to
/shelly(via mqtt.vhost). https://www.rabbitmq.com/docs/vhosts -
Applies topic permissions so publish/subscribe is limited to your MQTT prefix (plus read-only shellies/command). https://www.rabbitmq.com/docs/man/rabbitmqctl.8#Access_control
-
Deletes the default guest user.
-
If
set_topic_permissionsisn’t available on your RabbitMQ, the script warns and leaves broader topic access until you upgrade.
-
-
Output you use on the Shelly
Writes an export folder with
ca.crt,client.crt,client.keyand prints a table of the exact values to copy into the Shelly MQTT settings.
Implementation
-
Run the script
./shelly-rmq-mqtt/setup-mqtt-mtls.sh \ --admin-user admin \ --admin-pass 'Sh3lly-i0T!' \ -C 'Shelly-Group' \ --client-id 'test-device' \ --vhost /shelly \ --mqtt-prefix 1pm-mini Connect host precedence (and cert CN): --connect-dns > --connect-ip > --ip (auto-detected if none). This chosen value becomes the server cert CN and what clients should dial.
Helpful flags (as needed)
Identity / Connect target (what clients dial; drives cert CN/SAN) --connect-dns # preferred: clients dial this name --connect-ip # clients dial this IP (if no DNS) Host identity (this machine) -i | --ip | --server-ip # override detected primary IP (used in summary & SAN) MQTT / tenancy / topics -V | --vhost # default /shelly --mqtt-prefix # topic ACL scope Certificates / outputs --tls-dir # default /etc/rabbitmq-tls --export-dir # default /etc/mqtt-cert --monitor-export-dir # default /etc/mqtt-cert-monitor --no-monitor-cert # skip -mon bundle --monitor-client-id # default -mon --force-regen # rotate CA/server/client even if present RabbitMQ versioning --rmq-series 3.13|4.0|4.1 # default 4.1 Auth / users --admin-user # default admin -p | --admin-pass # default auto-generated if omitted -C | --client-cn # default Shelly-Group --client-id # default = Networking (temporary compatibility) --keep-plaintext # keep 1883/15672 open during migration Logging / diagnostics -l | --log-level debug|info|warn|error -d | --debug # stream logs; no spinner --debug-tls | --tls-debug # print certificate diagnostics (or DEBUG_TLS=1)
The script will run and will go over each step and will show a success indicator and an error if it occurs.
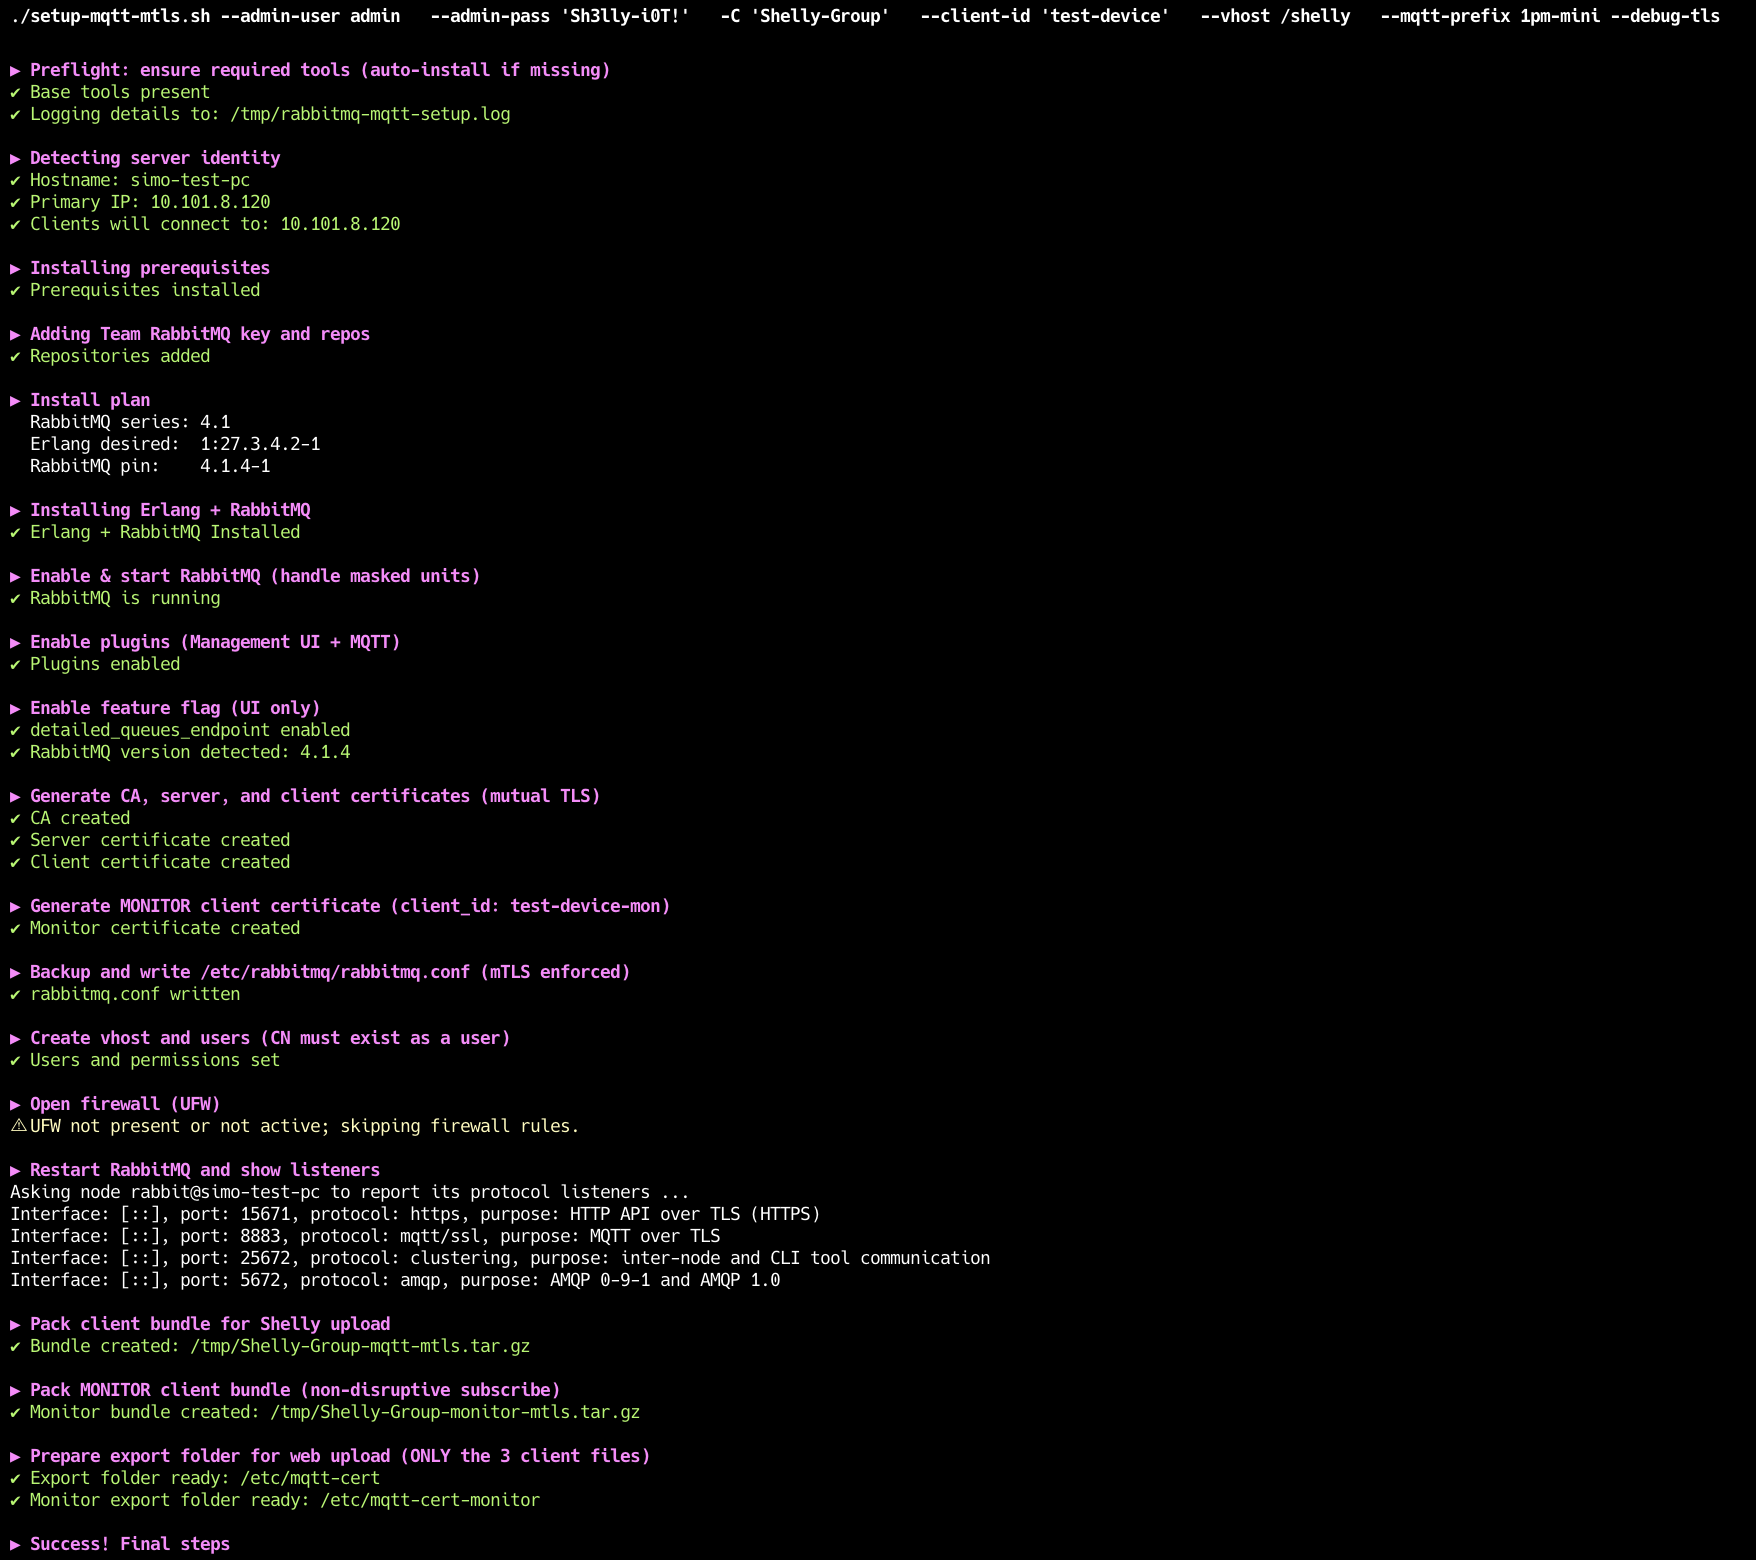
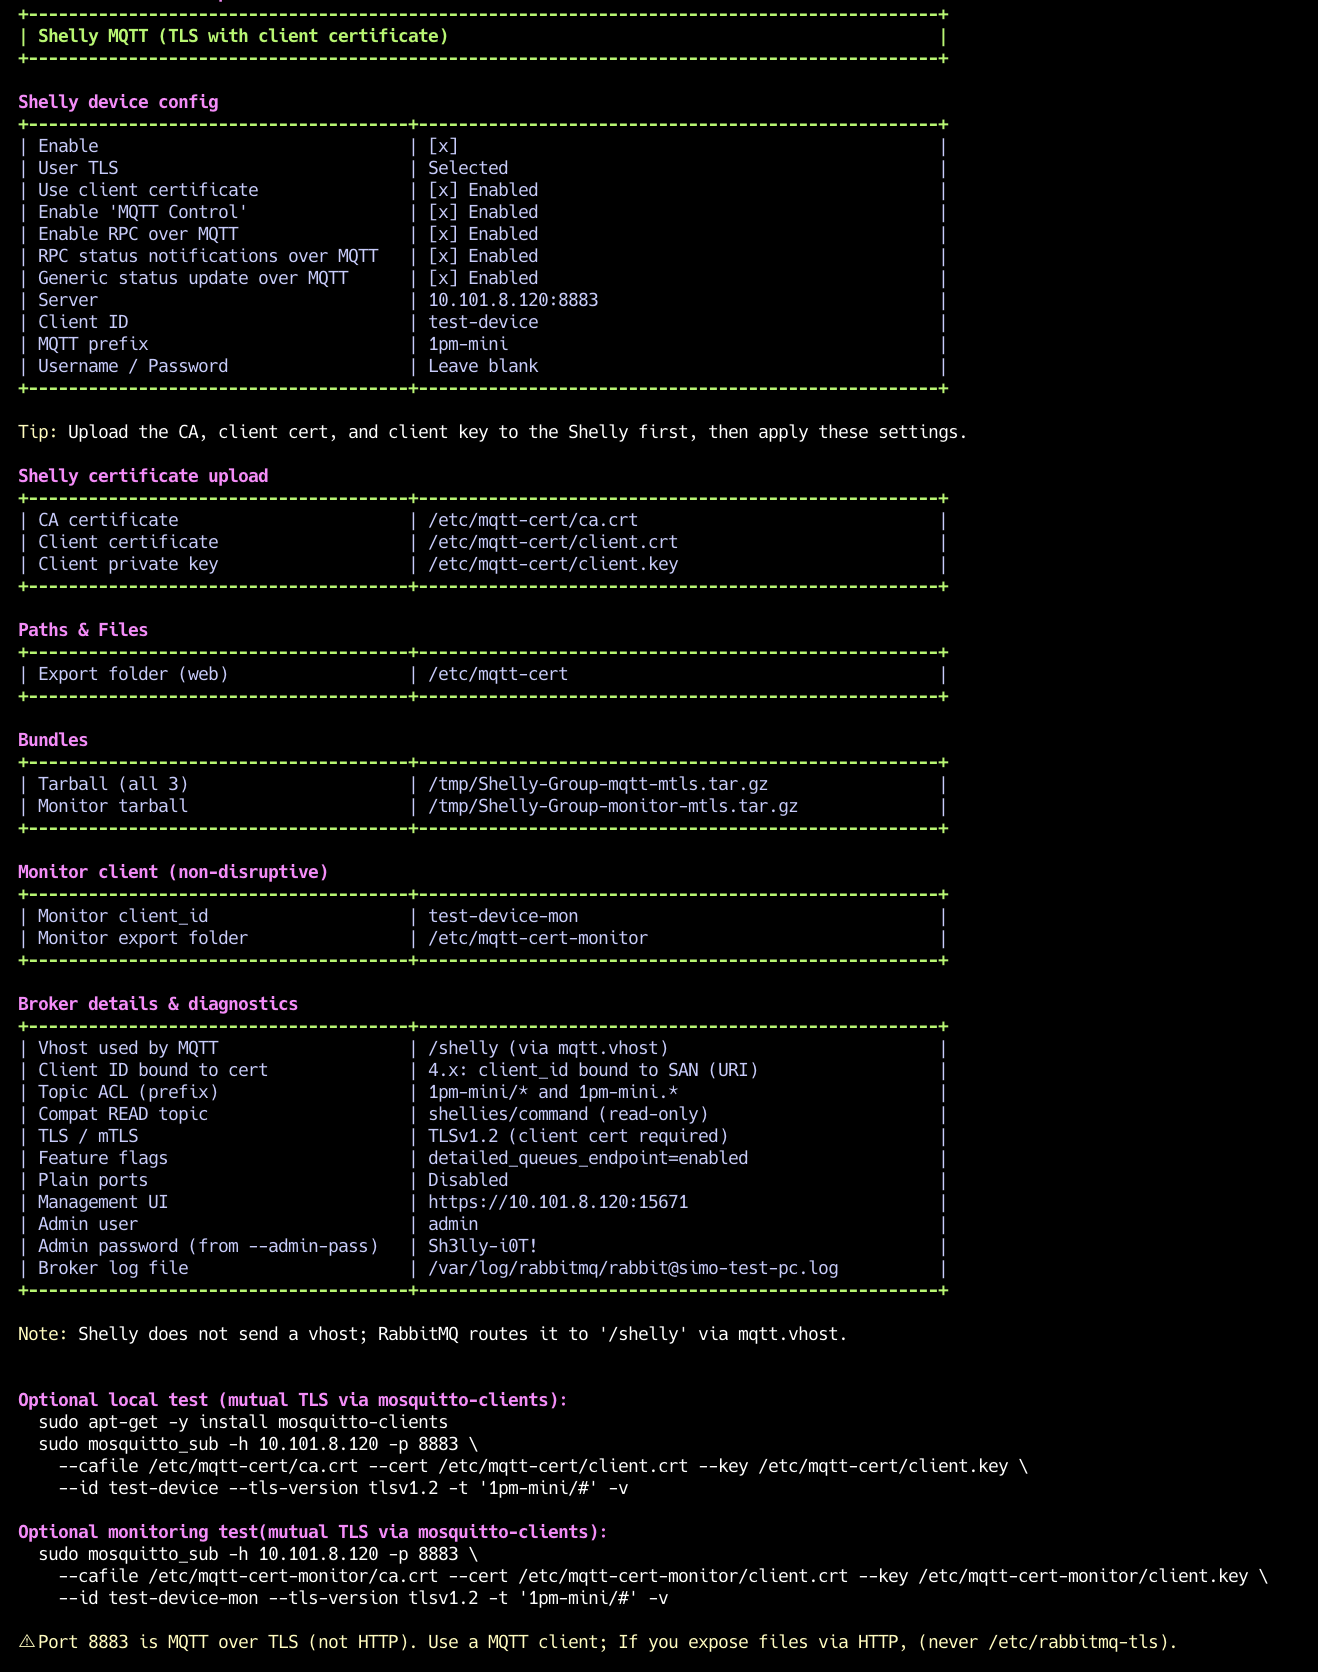
When it finishes, note the summary table at the bottom:
-
Broker IP/ports
-
Client ID and MQTT prefix
-
Paths to
ca.crt,client.crt,client.key(export folder) -
Shelly config options
-
Management URL:
https://(or:15671 https://if CN is an IP):15671 -
Admin user and password (password is auto-generated unless you pass
--admin-pass) -
Log file path:
/tmp/rabbitmq-mqtt-setup.log
-
Upload certificates to the Shelly
-
Open Shelly Web UI → Settings → TLS Configuration.
-
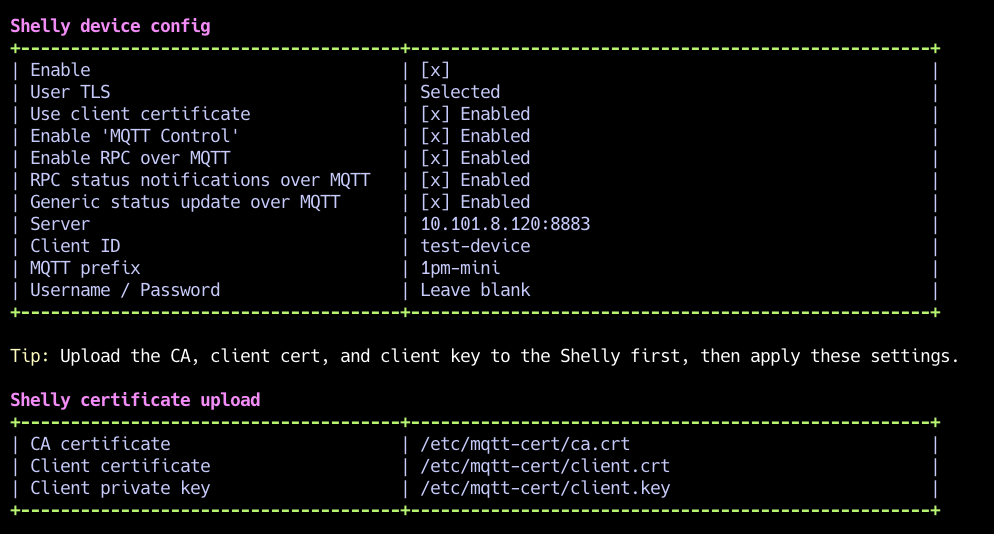
Upload the three files from the script’s export folder:
-
CA certificate: ca.crt
-
Client certificate: client.crt
-
Client private key: client.key
-
-
Upload each file individually: select the file, click Upload, and wait for the popup confirming success. Repeat for all three.
-
-
Configure Shelly MQTT
-
Open Shelly Web UI → Settings → MQTT.
-
Configure the values from the script:
-
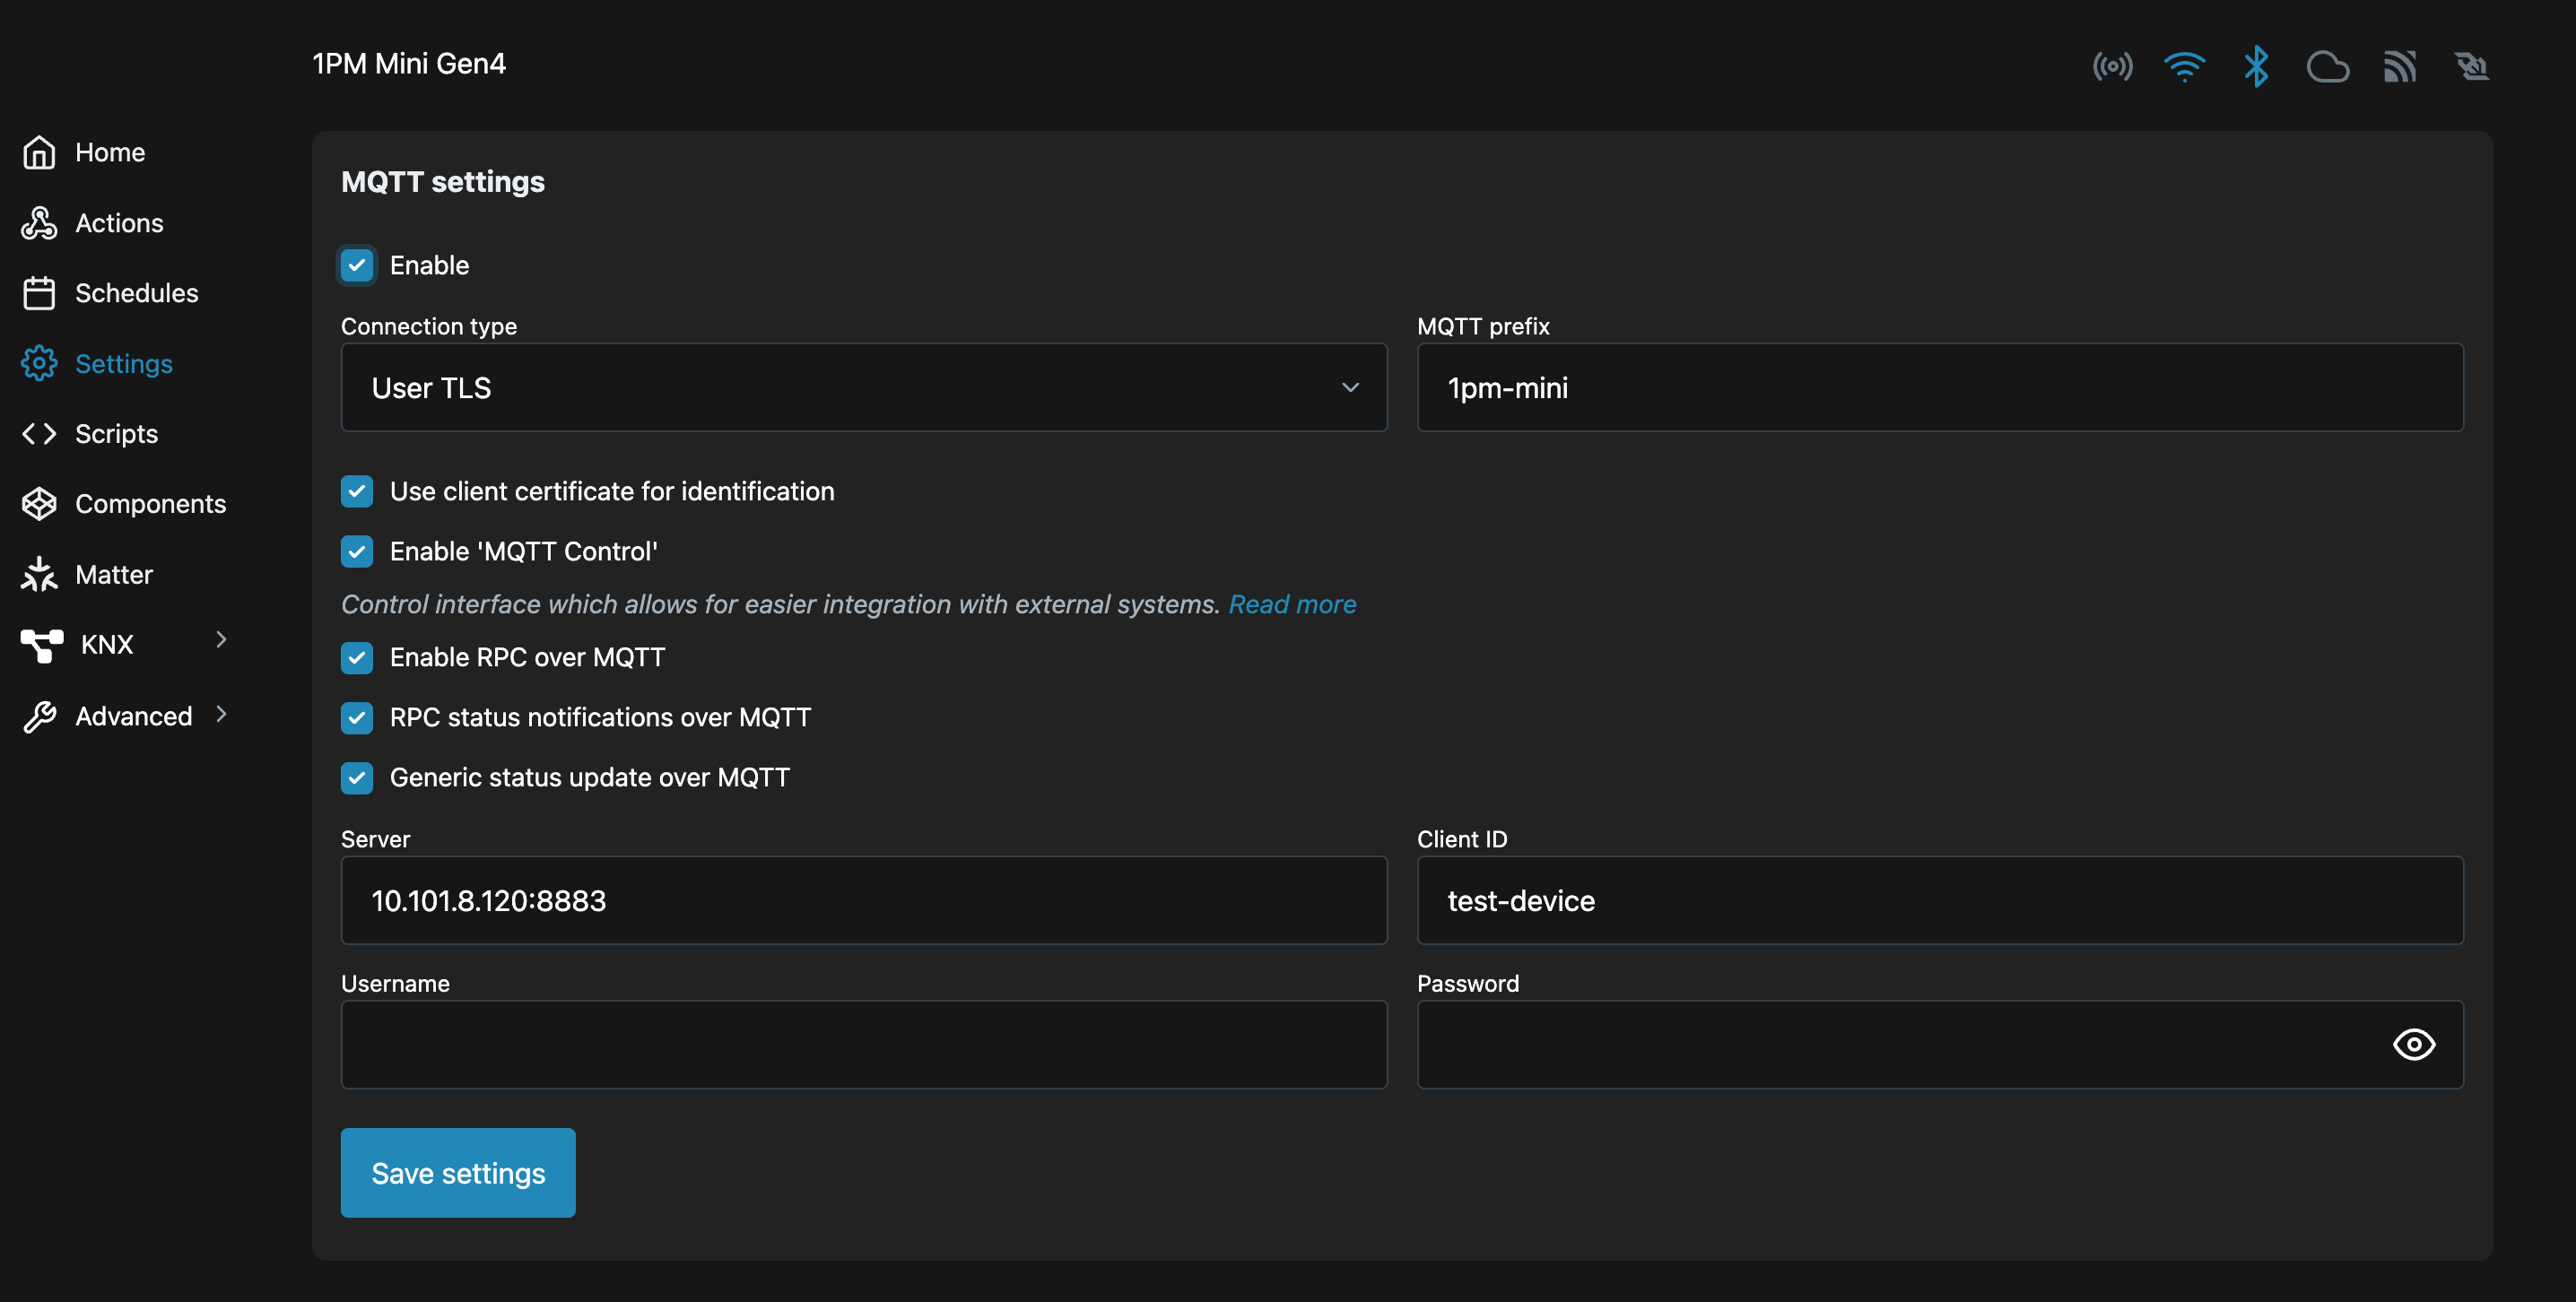
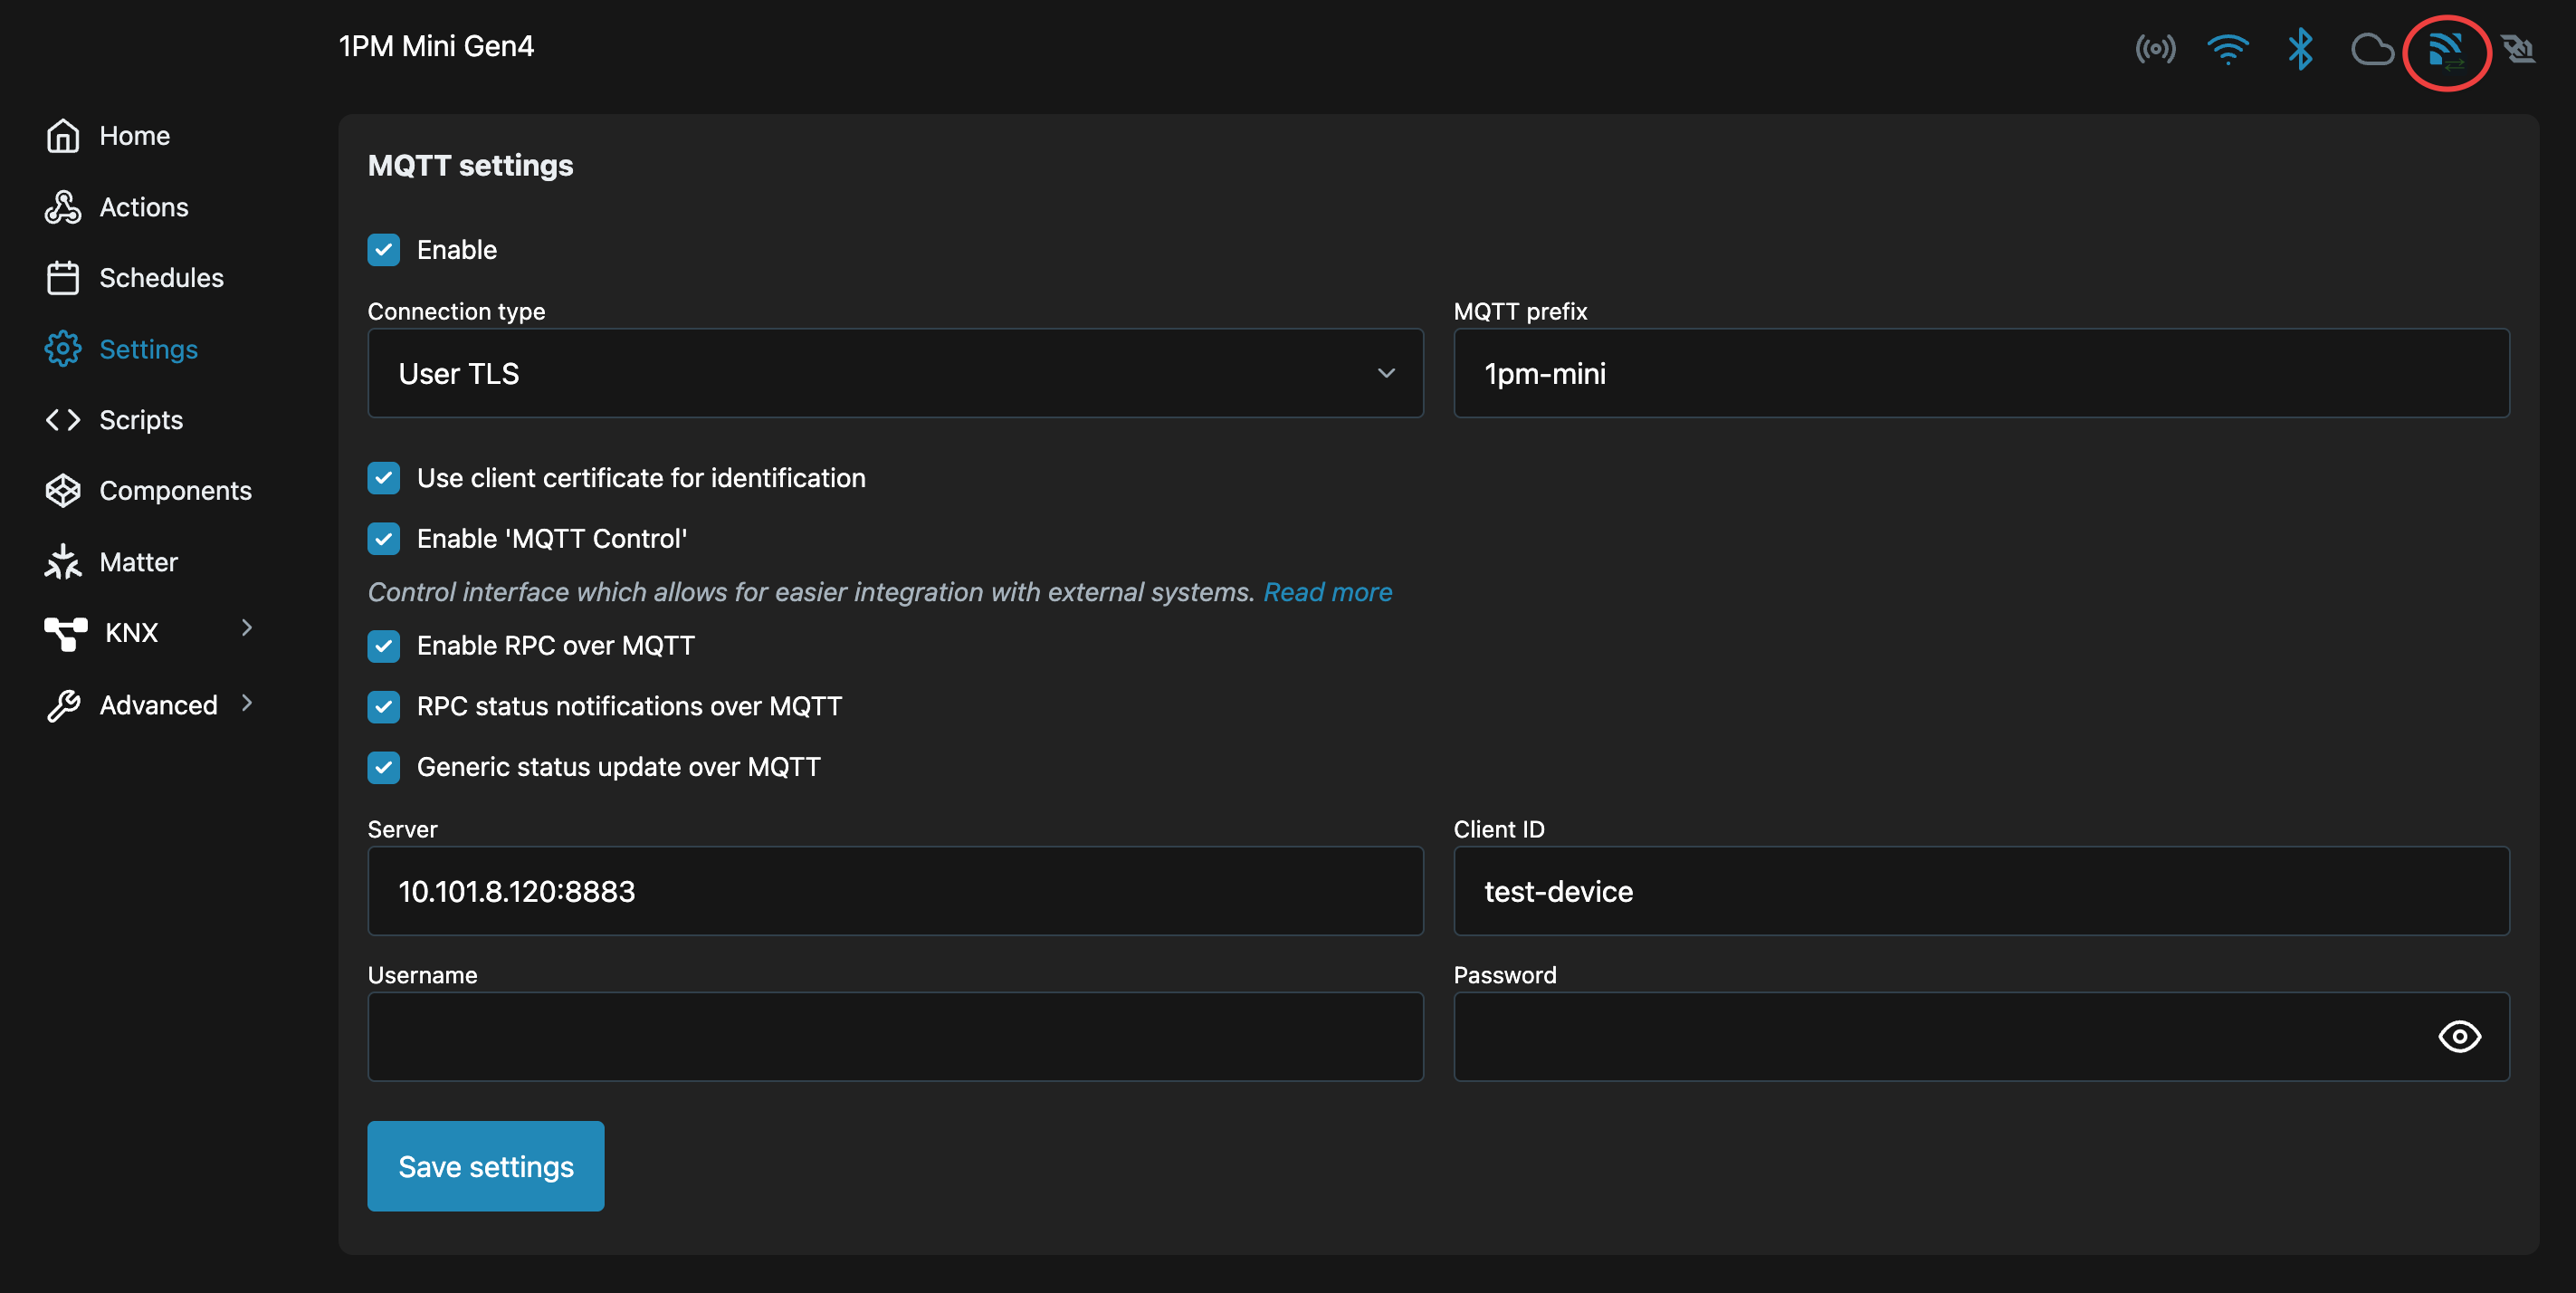
Enable: Selected User TLS: Selected Use Client Certificate: Enabled Enable 'MQTT Control': Enabled Enable RPC over MQTT: Enabled RPC status notifications over MQTT: Enabled Generic status update over MQTT: Enabled Server: Value from the script Client ID: Value from the script MQTT Prefix: Value from the script Username / Password: Leave blank -
Click Save Settings and reboot the device
Once finished with the configuration, the device should look like this:
-
After the Shelly reboots, run the monitoring command printed by the script’s summary. It’s auto-generated from the values you provided and uses the monitor certificate (distinct client_id) so it won’t disconnect the device. You should see messages flowing from the Shelly to RabbitMQ.

You should see the Shelly connect and publish.

You can also confirm success in the Shelly’s web interface: the MQTT icon in the top-right shows two arrows when connected. If you see the arrows, the device is actively linked to RabbitMQ over MQTT/TLS.
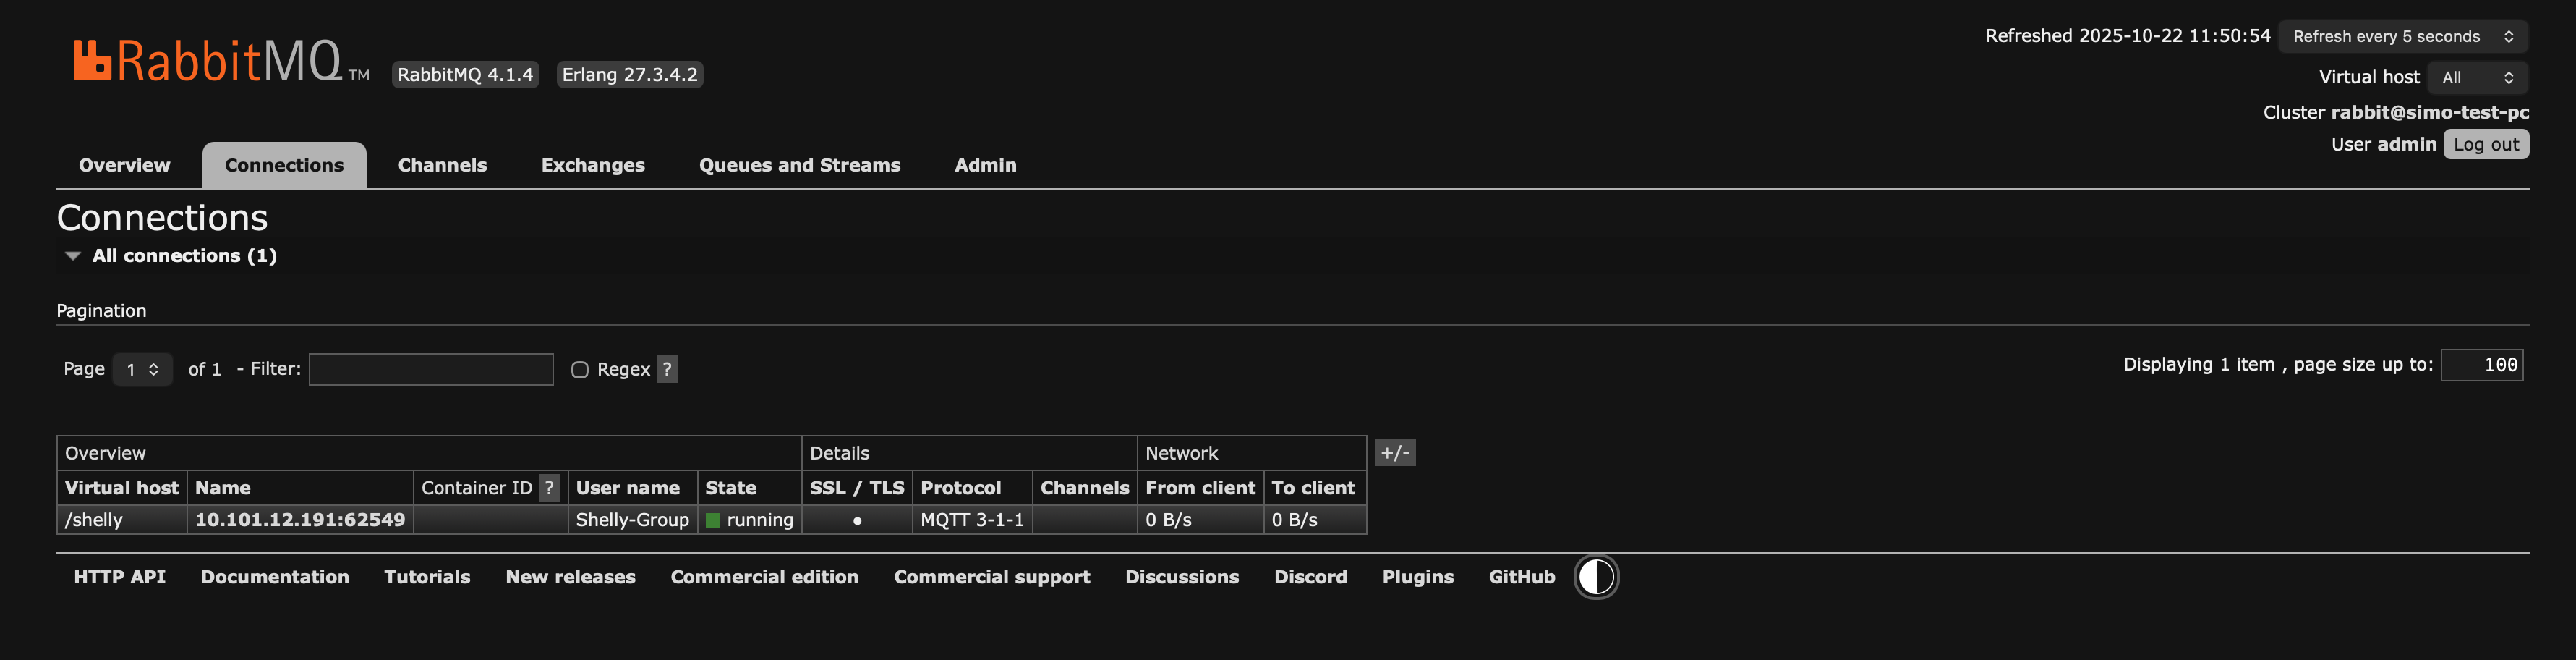
You can also see an indicator in the RabbitMQ Web UI, under Connections
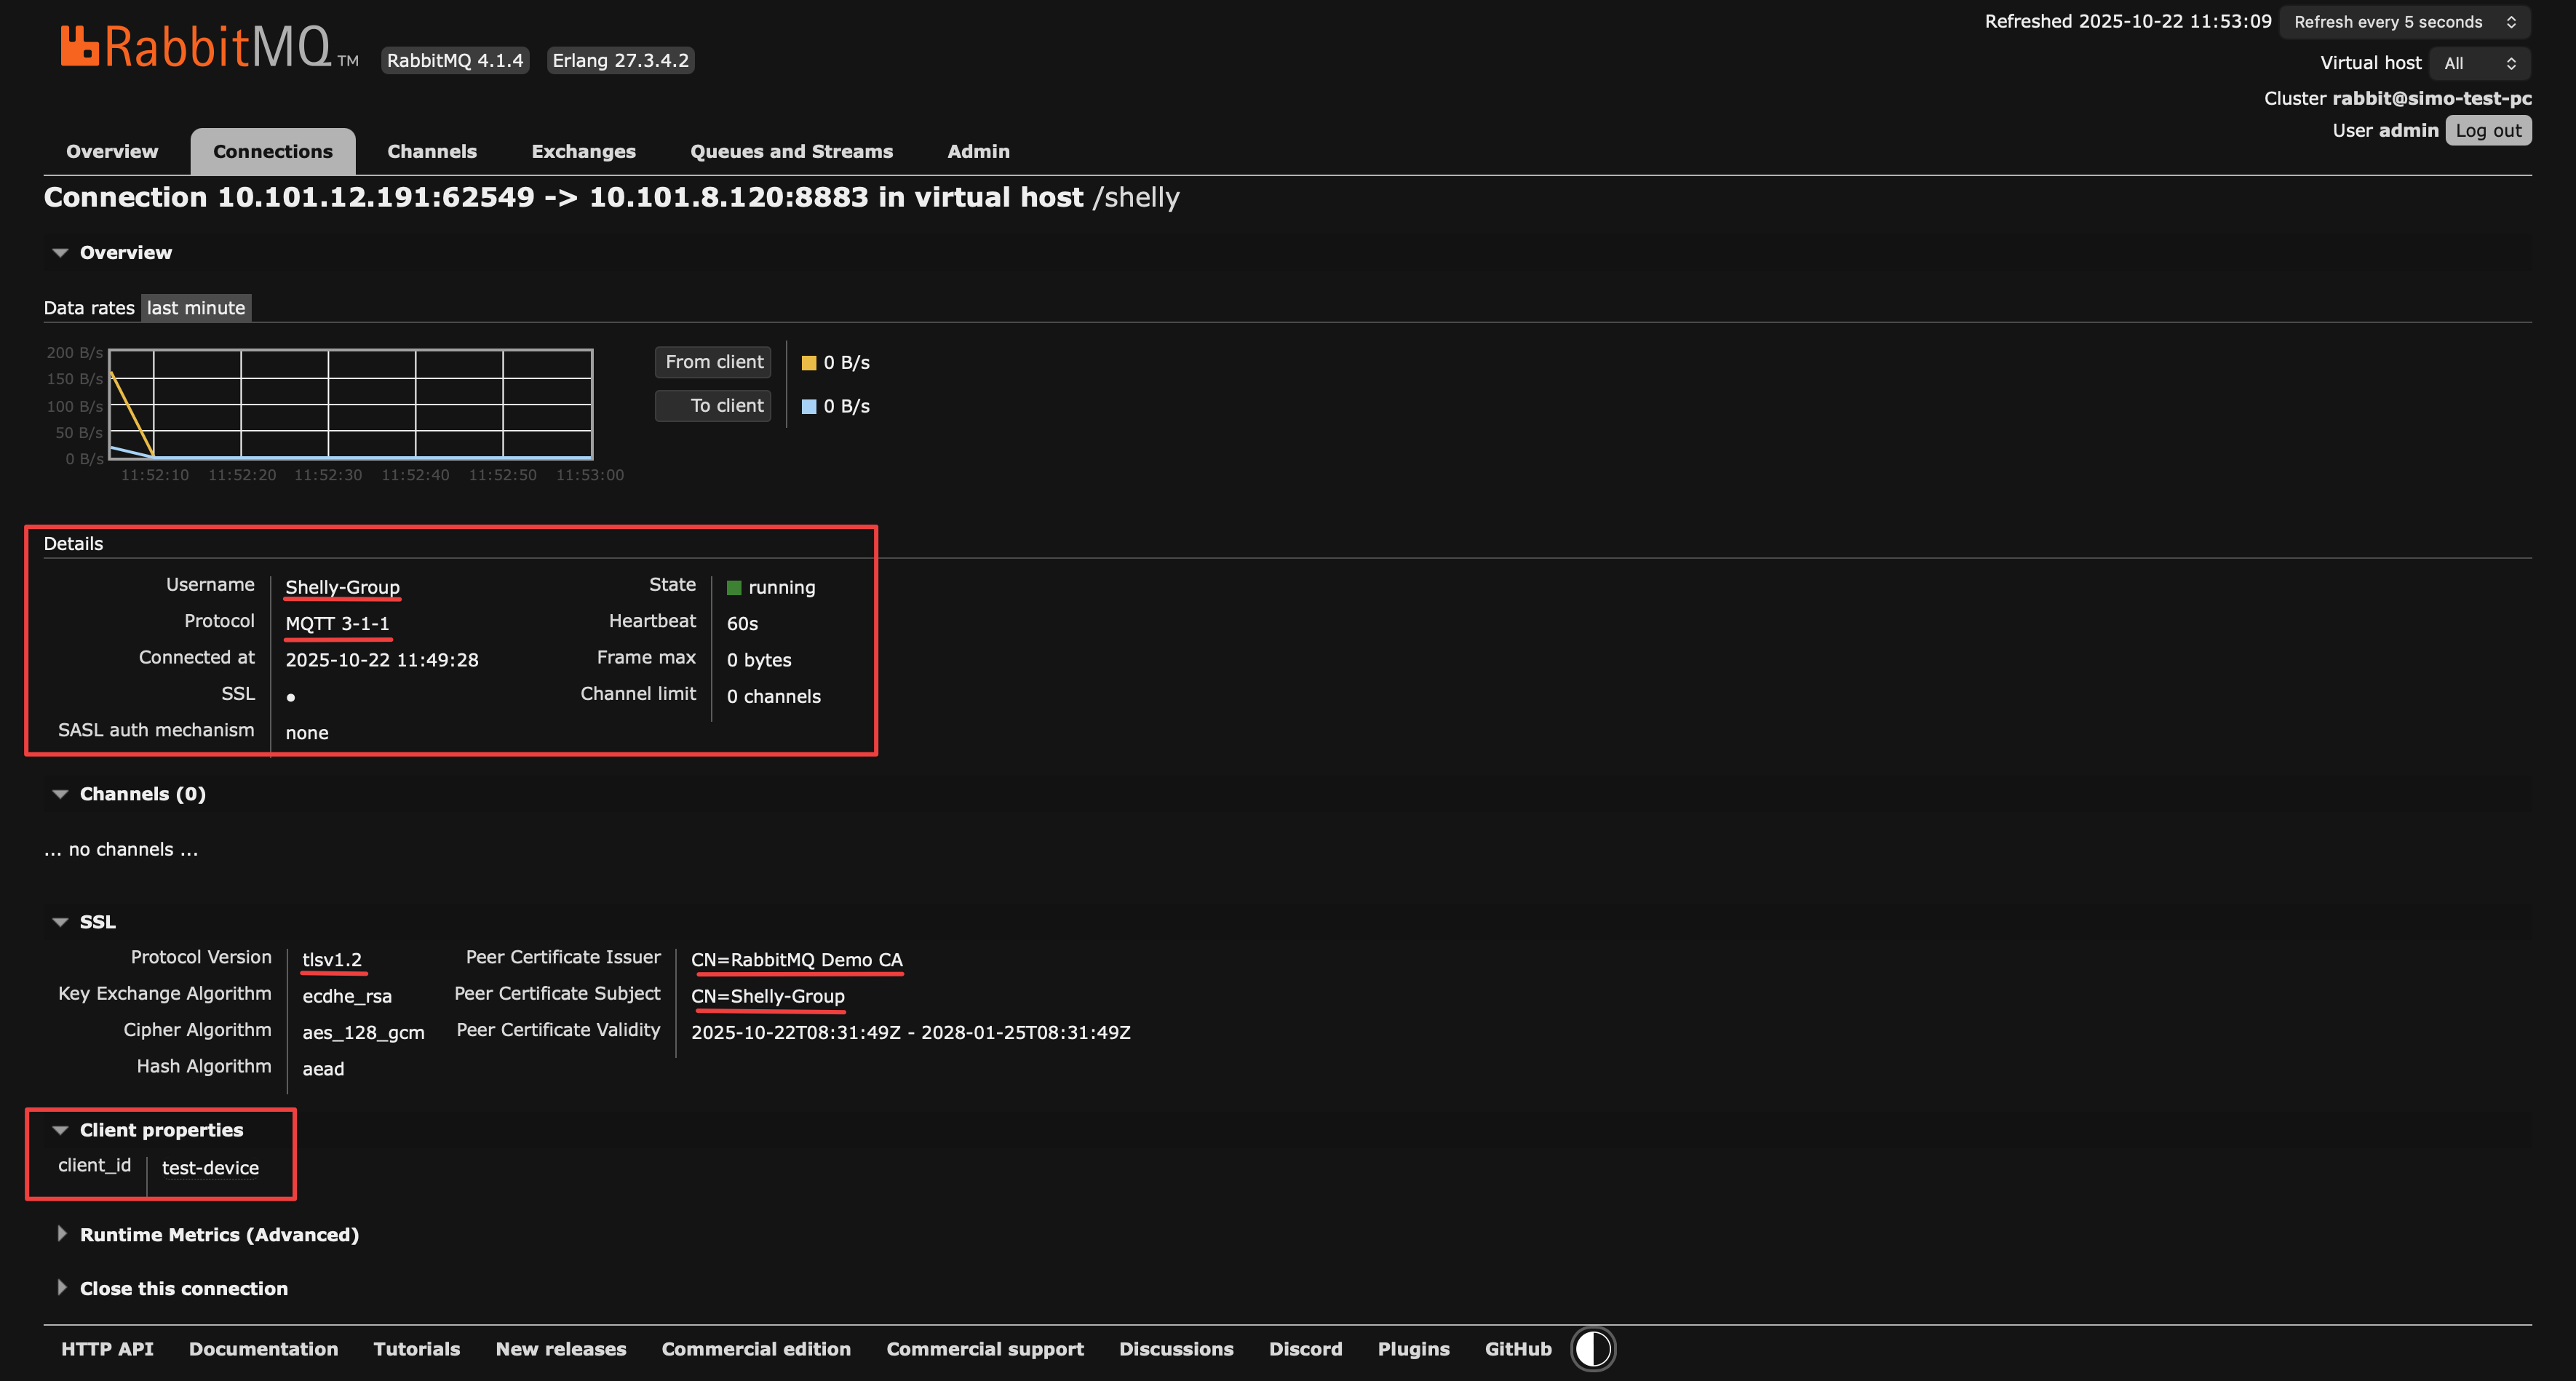
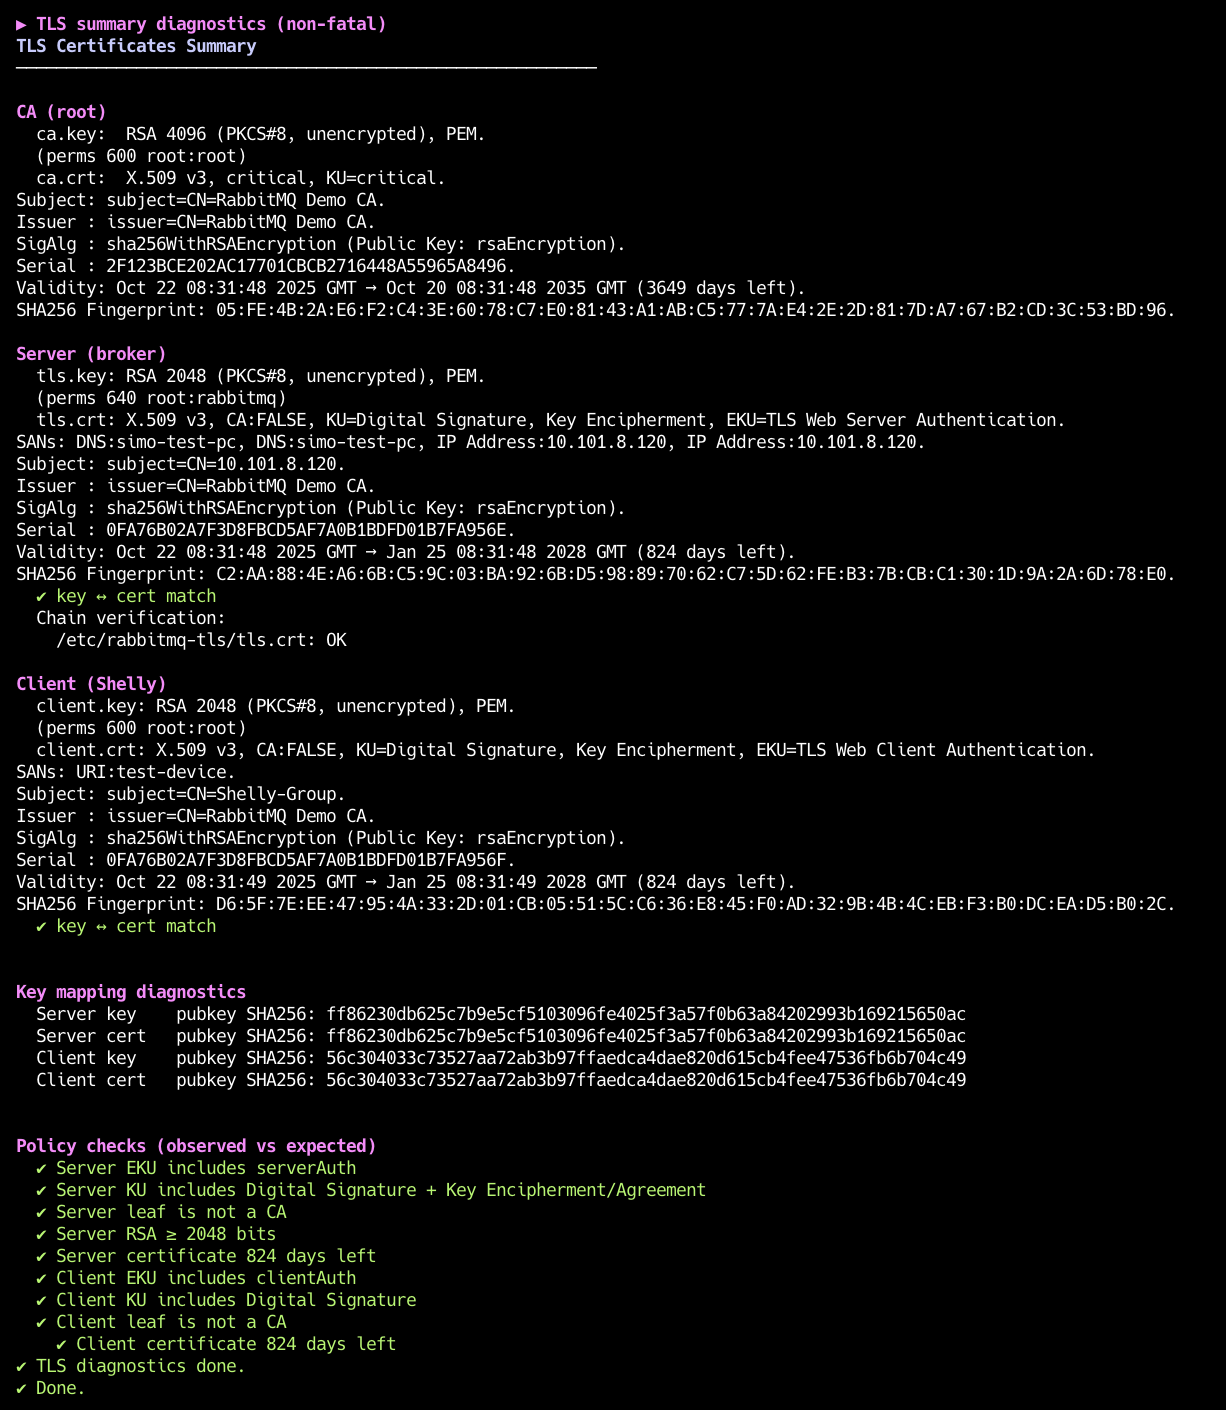
The script Also prints a certificate debug summary helping you see what certificates were generated in order to minimize the issues that can occur. Please keep in mind that you need to use the --debug-tls flag.
Troubleshooting
-
Time sync - Make sure broker & Shelly clocks are correct (NTP). Skewed time breaks TLS.
-
Three files uploaded -
ca.crt,client.crt,client.key(each uploaded individually, success popup). -
Client ID vs SAN - On RabbitMQ 4.1, the MQTT Client ID must match the cert SAN (URI). If they differ, connection is rejected.
-
On RabbitMQ 3.13, binding
client_idfrom SAN is not supported; onlyCN->usernameis used.
-
-
CN user exists - The cert CN must match an existing RabbitMQ user (no password needed with mTLS).
-
Ports - Use 8883 (MQTTS). 1883/15672 are off unless you ran with --keep-plaintext.
-
Firewall - If UFW is active, the script opens 8883 and 15671; otherwise it does not change firewall rules.
-
Prefix - Topics must sit under your MQTT prefix or RabbitMQ ACLs will block them.
-
Key <-> cert match: If connections fail, run with
--debug-tlsand check the “key <-> cert match” line for both server and client.