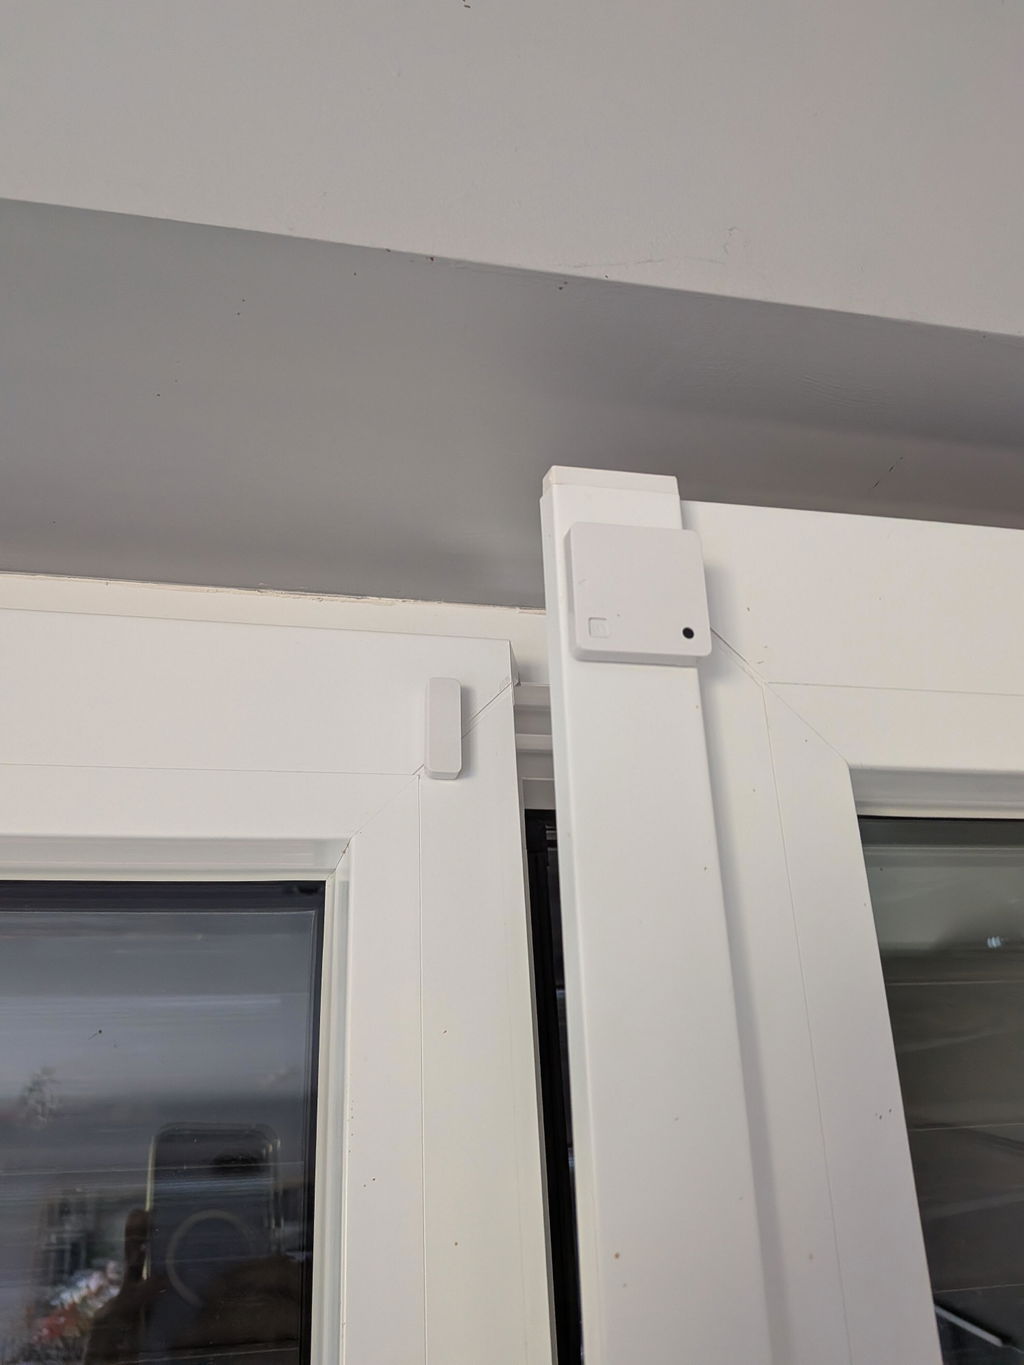
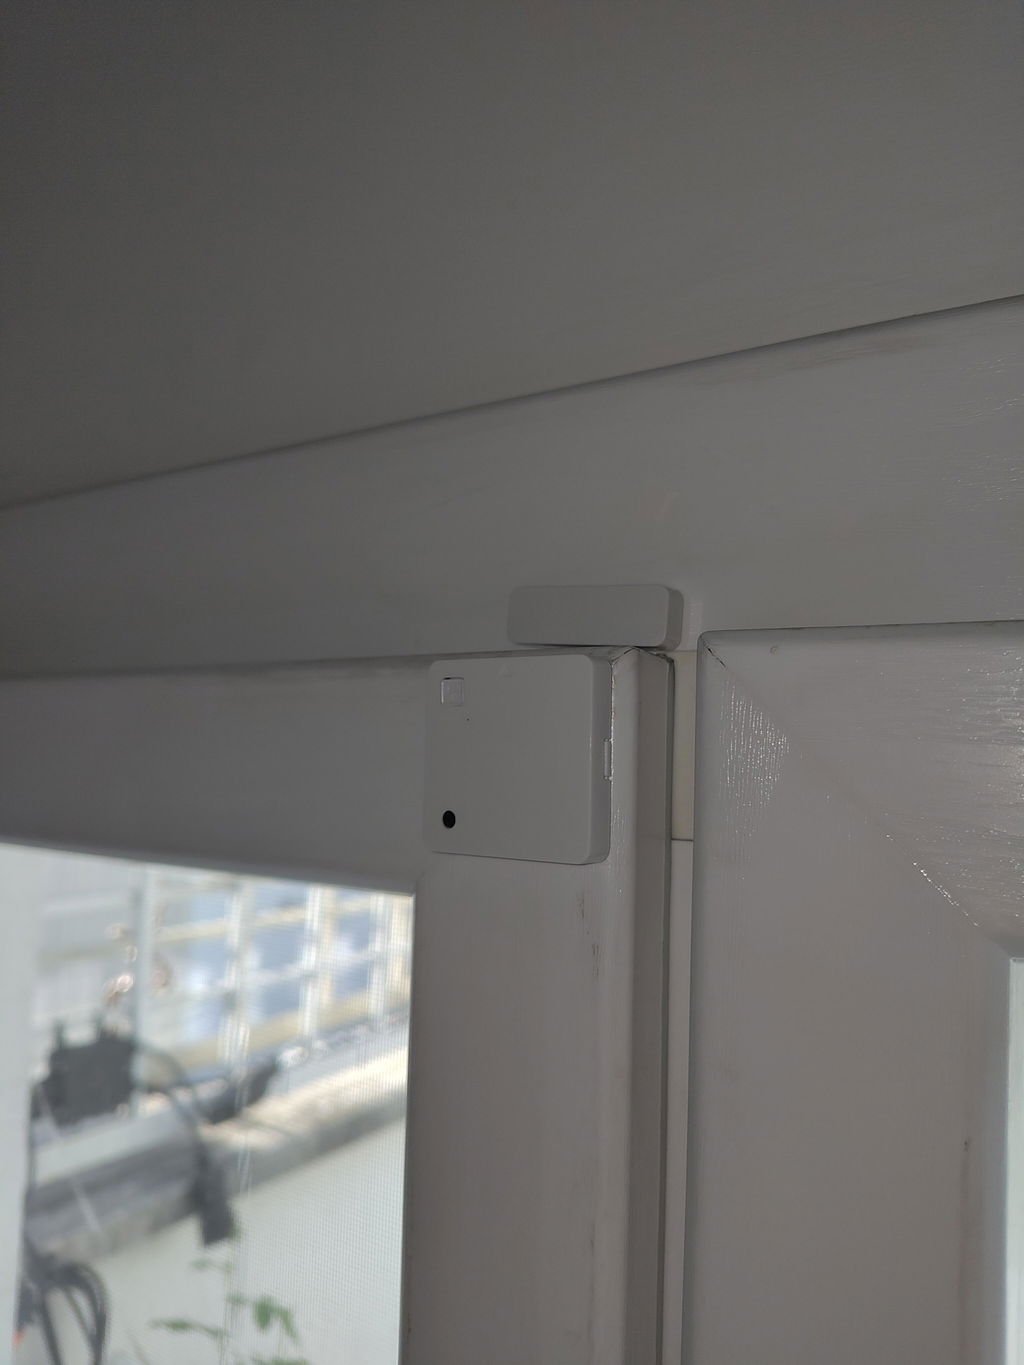
Device identification
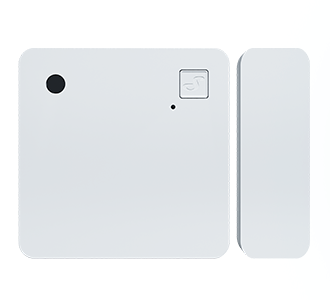
Device: Shelly Wave Door/Window (EU)
EU Part number/Ordering Code: QLDW-002CEU
Z-Wave Product type ID: 0x0100
Z-Wave Product ID: 0x0081
Z-Wave Manufacturer: Shelly Europe
Z-Wave Manufacturer ID: 0x0460
This device supports both Z-Wave® (mesh) and Z-Wave® Long Range (star) network topologies. During the device inclusion process, you must select one type of network topology.
Bellow sections marked with * are valid only for Z-Wave® mesh network inclusion and are not applicable for Z-Wave® Long Range star network inclusion.
Terminology
Click here to unhide/hide
-
OTA - Over-The-Air firmware update.
-
FW - Firmware
-
ZAF - Z-Wave® protocol
-
NIF - Node Information Frame; the frame that is sent at every adding (inclusion) to present/advertise the Device’s capability to the gateway, so that it may adjust its operating ability.
-
CC - Command Class (ZAF centerpiece of interoperability). The files/processes that determine how data is sent and handled/received. Command Classes include their signatures while sending data to allow recognition of which process is sending data for the destination device.
-
Switch - A toggle switch or a bi-stable switch.
-
Push-button - A momentary switch or a monostable switch.
-
Switch/push-button - It can be a switch or a push-button.
-
Double press - If the delay between the first and the second press on the switch/push-button is less than 500 ms, this is interpreted as a double press.
-
Gateway (GW) - A Z-Wave® gateway, also referred to as a Z-Wave® controller, Z-Wave® main controller, Z-Wave® primary controller, or Z-Wave® hub, etc., is a device that serves as a central hub for a Z-Wave® smart home network. The term “gateway” is used in this document.
-
Mesh network - devices can communicate with each other in addition to the gateway. Devices (only mains powered) can act as repeaters to extend network.
-
Long range network - devices can communicate only with gateway (no repeater function).
-
S button - The Z-Wave® Service button, located on Z-Wave® devices and is used for various functions such as adding (inclusion), removing (exclusion), resetting the device to its factory default settings and to switch power output on/off (valid only for Wave Plugs). The term "S button" is used in this document.
-
Device - In this document, the term “Device” is used to refer to the Shelly Wave device that is a subject of this guide.
-
End device - Z-Wave end devices are nodes in a Z-Wave network that are not gateways, such as switches, door locks, sensors, etc.
-
Node ID - The Z-Wave Node ID is a unique identifier assigned at the adding (inclusion) to each device in a Z-Wave network, allowing the network to identify and communicate with this device.
-
HOME ID - The Z-Wave Home ID is a unique identifier assigned to each Z-Wave network and each device in that network. It distinguishes your Z-Wave network from other networks and ensures that your Z-Wave devices only communicate with devices in your own network.
-
Adding/Inclusion - The process of adding Z-Wave device to a Z-Wave network - gateway. The words included, added, etc. are used in this regard.
-
Removing/Exclusion - The process of removing Z-Wave device from a Z-Wave network - gateway. The words excluded, removed, etc. are used in this regard.
-
Factory reset - After Factory reset, all custom parameters and stored values (kWh, associations, routings, etc.) will return to their default state. The HOME ID and NODE ID assigned to the Device will be deleted. Use this reset procedure only when the gateway is missing or otherwise inoperable.
-
*Learn mode - a state that allows the Device to receive network information from the gateway.
-
Normal mode - Is the state of the device which refers to the operational state of a device when it is functioning under regular conditions (switching on/off, dimming, etc.) either during active usage or while in standby mode but still powered.
-
SmartStart - SmartStart enabled devices can be added (included) to a Z-Wave network by scanning the Z-Wave QR code on the device with a Gateway that supports SmartStart inclusion. The SmartStart enabled device will be automatically added within 10 minutes of being switched on in the vicinity of the Z-Wave network.
-
MUST - MUST be implemented
-
OPTIONAL - implement it if time/budget allows
-
Associations - Associations are used for direct communication between the Device and other devices within your Z-Wave network without the need of the Z-Wave gateway.
-
Power cycle - Reboot the Device/power supply On/Off of the Device
-
Blind - Refers to any kind of window treatment, such as venetian blinds, roller blinds (screens), roller shutters, vertical window blinds, curtains, integral venetian blinds, pleated blinds, awnings, etc. Additionally, Wave Shutter can also control window motors, projector screens, or any type of bi-directional AC motor.
-
Power consumption (W) - refers to the rate at which energy is consumed or used by an electrical device or system. It is measured in watts (W).
-
Energy consumption (kWh) - refers to the total amount of electrical energy consumed by a device or system over a specific period of time. It is measured in kilowatt-hours (kWh).
-
Ordering code - The ordering code is the same as the Part number (PN). Where there is not enough space to write the Ordering code, abbreviation PN is used. The PN is written on the DSK label on each device.
Short description
The Device is a Z-Wave® sensor designed to detect the opening and closing of doors or windows. Beyond simple detection, it can also measure the angle of inclination for doors or windows that tilt or turn. Additionally, the sensor is equipped with a built-in light sensor, offering enhanced functionality for smart home automation.
Use cases
-
Climate control: Adjust the heating, ventilation, and air conditioning system based on current open/close door/window status to maintain a comfortable indoor environment.
-
Alerts and notifications: Receive alerts or notifications when the open/close status is changed and you are away.
-
Security enhancement: Increase your home protection by detecting unusual door/window that might indicate intrusion.
-
Appliance control: Adjust operation of thermostats and lights based on the current open/close status and illumination measurement.
Basic Functions
-
SmartStart
-
Assocciations
-
Door/window opening and closing detection
-
Door/window inclination angle measurement
-
Illumination measurement
-
OTA - Over-The-Air firmware update
Operational Instructions
Click here to unhide/hide
Door/window opening and closing detection
If a conventional door or window is opened or closed, the Device will by default immediately broadcast information about (open/close) event, the illumination and battery status (if changed).
Door/window inclination angle measurementIf a door or window, which tilts and turns is opened, the Device will immediately broadcast information about the event, the illumination, and the battery status at the time of the opening detection and 2 seconds later will broadcast information containing the inclination angle (if enabled by parameters 155) and the battery status at the moment. If the door or the window is closed the Device will broadcast information about the event, the inclination angle (zero), the illumination, and the battery status at the time of the closing detection.
Illumination measurementWhenever Device is triggered or wakes up, it will broadcast information about the illumination (if enabled by parameters 155).
OTA - Over-The-Air firmware update
OTA stands for Over-The-Air, and it refers to the wireless firmware update to end devices
Z-Wave Security communication protocols supported
Unsecure, S0 Security, S2 Unauthenticated Security, S2 Authenticated Security
FW version
FW version is stored in the Device, also if it is updated by OTA. Firm version is possible to read by the Gateway.
Device serial number
Device serial number is stored in the Device after testing in production. Device serial number is possible to read by the Gateway.
Device PART number (PN)
Device Part number is stored in the Device after testing in production. Device Part number is possible to read by the Gateway.
Main applications
-
Residential
-
MDU (Multi Dwelling Units - apartments, condominiums, hotels, etc.)
-
Light commercial (small office buildings, small retail/restaurant/gas station, etc.)
-
Government/municipal
-
University college
Integrations
Shelly Wave devices are developed on the world's leading technology for smart homes – Z-Wave.
This means Shelly Wave works with all certified gateways supporting Z-Wave communication protocol.
To make sure the functions of Shelly Wave products are supported on your gateway, we are regularly executing compatibility tests of our devices with different Z-Wave gateways.
Connectivity
Z-Wave - Unsecure, S0 Security, S2 Unauthenticated Security, S2 Authenticated Security
User interface
S button and operating modesSingle press (<0,5s):Device wake upDevice not included, Blue led blink onceDevice included, Green led blink once if GW respond with "Wake Up No More Information"Device included, Green led blinks for 10s if GW doesn’t respond with "Wake Up No More Information"Settings mode:Is required to start the desired procedure, for example: adding (inclusion (*not available for Long Range)), removing (exclusion), factory reset, etc. It has a limited operating time. After completing the procedure in Setting mode, the Device automatically switches to Normal mode.Entering Setting mode:Press the S button (>0,5s)Device NOT included: LED is solid blue.Device included: LED is solid green for 0,5s then blueAn additional quick press on the S button changes the menu in an infinite loop.The Settings mode has a timeout of 10s before entering again into Normal mode.
S button’s functionsManually adding the Device to a Z-Wave network (*not available for Long Range inclusion)Manually removing the Device from a Z-Wave networkFactory Reset the DeviceWake-up
LED Signalisation
Click here to unhide/hide
General rulesSwitching between Normal and Settings mode is done by press and hold the S button.Solid LED means that you are in the Settings mode. Once in settings mode, switch to normal mode goes automatically after 10s.Press on the S button wake up LED for 1s, and device power cycle wakes up LED for 10s.During module boot up LED will blink in mode 5 (0,2s On blue/0,2s On red) for 4-5 s.Normal mode LED status: Normal mode is defined by stable device function that can remain for an infinite time.
LED type: RGB dimmable
Normal mode
Factory reset and reboot
During factory reset, the LED will turn solid green for approx. 500ms, then the blue LED will be blinking in Mode 1.
Adding / RemovingDuring adding or removing, the LED will be blinking blue in Mode 2. 
OTA firmware updatingDuring the OTA update, the LED will be blinking blue and red in Mode 2. 
Adding / Removing menu selected (*adding not available for Long Range inclusion)When the menu is selected the LED will be on blue, for maximum of 10 seconds.
Adding / Removing menu - while pressing S- button - Add/Remove process selected (*adding not available for Long Range inclusion)When the menu is executing the LED will be blinking blue in Mode 3. 
Factory reset menu selectedWhen the menu is selected the LED will be on red, for maximum of 10 seconds.
When the menu is executing the LED will be blinking red in Mode 3.
Alarm Mode
NA
LED blinking modes
Click here to unhide/hide
| LED blinking modes |
| Mode 1 | 0,5s On/2s Off |
| Mode 2 | 0,5s On/0,5s Off |
| Mode 3 | 0,1s On/0,1s Off |
| Mode 4 | (1x to 6x - 0,2s On/0,2s Off) + 2s Off |
| Mode 5 | 0,2s On blue/0,2s On red |
Technical Specifications
| Power supply | 1x 3 V CR2032 battery (included) |
| Battery life | Up to 2 years |
| Reed switch | Yes |
| G-sensor | Yes |
| Light sensor | Yes |
| Long range network | Distance (depends on local condition) | Up to 80 m indoors (262 ft.) or up to 1000 m outdoors (3281 ft.) |
| Z-Wave® repeater | No |
| Z-Wave® frequency bands | 864 MHz |
| Mesh network | Distance (depends on local condition) | Up to 40 m indoors (131 ft.) |
| Z-Wave® repeater | No |
| Z-Wave® frequency bands | 868.4 MHz |
| CPU | Z-Wave® S800 |
| Maximum radio frequency power transmitted in frequency band(s) | < 25 mW |
| Size (H x W x D) | |
| Weight | |
| Shell material | Plastic |
| Color | White, black, brown |
| Ambient temperature | -20°C to 40°C / -5°F to 105°F |
| Humidity | 30% to 70% RH |
| Max. altitude | N/A |
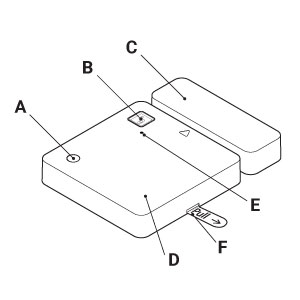
Wave Door/Window description
Legend
A: Light sensor
B: S button
C: Magnet
D: Sensor unit
E: LED indication
F: Battery protective foil
First steps
The Device comes ready to use with the battery installed. Before usage of the Device, remove the protective foil from the battery compartment to activate the battery. However, if pressing its button does not make the Device start emitting signals, you might need to insert a battery. See the Replacing the battery section.
Mounting
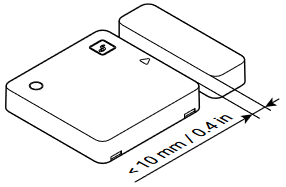
⚠ATTENTION! When mounting the Device make sure the small triangle on the sensor unit points towards the magnet as shown in Fig. 2 and the distance between the sensor unit and the magnet is less than 10 mm / 0.4 in when the door or the window is closed.
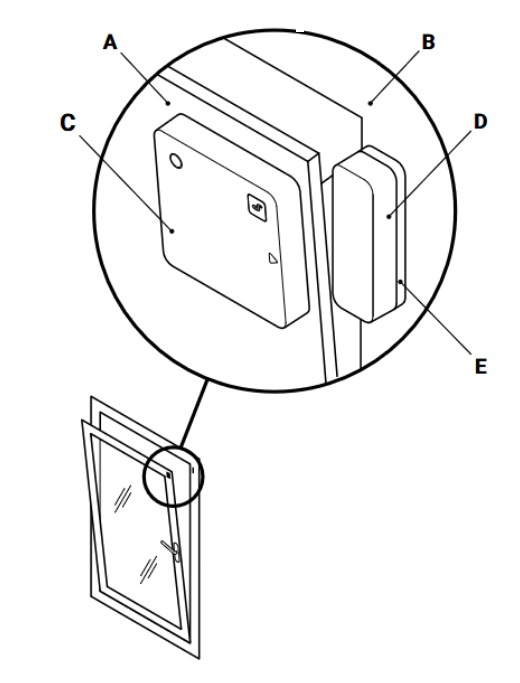
You can place the magnet left, right, above, or below the sensor unit. If you want to monitor a door or window that tilts and turns, mount the sensor unit (C) on the door or the window (A) and the magnet (D) on the frame (B) as shown in Fig. 3. Use the supplied double-sided foam stickers to affix the sensor unit and the magnet to the door or the window and the frame. Depending on the door or window frame, you may need to align the magnet and sensor unit by raising one of them using shims (E). If you want to monitor a conventional door or window, we suggest, if possible, mounting the sensor unit on the frame and the magnet on the door or the window.
Replacing the battery
-
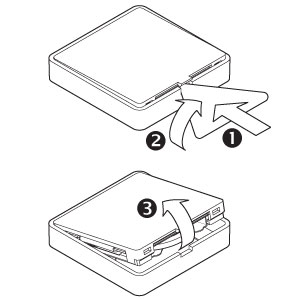
Open the back cover as shown in Fig. 4.
-
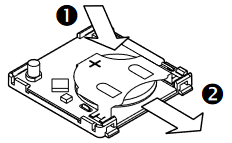
Extract the exhausted battery by first pushing it through the battery holder cutout and then pulling it out as shown in Fig. 5.
-
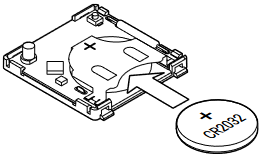
Slide in a new battery as shown in Fig. 6
-
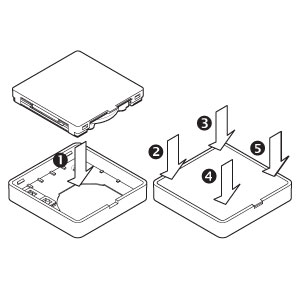
Replace the back cover by pressing it to the sensor unit at the four angles until you hear a clicking sound as shown in Fig. 7.
About Z-Wave®
Click to unhide/hide
The Z-Wave® protocol is an interoperable, wireless, RF-based communications technology designed specifically for control, monitoring, and status reading applications in residential and light commercial environments. Mature, proven, and broadly deployed, Z-Wave® is by far the world market leader in wireless control, bringing affordable, reliable, and easy-to-use 'smart' products to millions of people in every aspect of daily life.
Interoperability has always been at the core of the Z-Wave® protocol, alongside the features like backward compatibility, security, and reliability. All Z-Wave® devices can be operated in any Z-Wave® network with other Z-Wave® certified devices, regardless of brand or manufacturer. All mains operated nodes within the network will act as repeaters regardless of vendor to increase the reliability of the network. There are 4000+ Z-Wave® certified products that are backwards- and forwards-compatible in the Z-Wave® ecosystem and well over 100 million devices currently in the market.
With over 20 years in the marketplace, Z-Wave® technology has best-in-class security measures to keep your home network smarter and safer.
Source: www.z-wavealliance.org, http://www.z-wave.com
Adding and removing the Device to a Z-Wave® network
Click here to unhide/hide
Adding the Device to a Z-Wave® network (inclusion)
SmartStart adding (inclusion)SmartStart enabled products can be added into a Z-Wave® network by scanning the Z-Wave® QR Code present on the Device with a gateway providing SmartStart inclusion. No further action is required, and the SmartStart device will be added automatically once the battery device wakes up in the network vicinity.With the gateway application scan the QR code on the Device label and add the Security 2 (S2) Device Specific Key (DSK) to the provisioning list in the gateway.Wake up the deviceCheck if the blue LED is blinks once. If so, the Device is not added to a Z-Wave® network.Adding will be initiated automatically within a few seconds after device wake’s up and the Device will be added to a Z-Wave® network automatically.The blue LED will be blinking in Mode 2 during the adding process. The green LED will be blinking in Mode 1 if the Device is successfully added to a Z-Wave® network.
-
Single press and check if the blue LED blinks once. If so, the Device is not added to a Z-Wave® network.
-
Enable add/remove mode on the gateway.
-
To enter the Setting mode, press the S button (>0,5s) on the Device until the LED turns solid blue.
-
Release and then press and hold (> 2s) the S button on the Device until the blue LED starts blinking in Mode 3. Releasing the S button will start the Learn mode.
-
The blue LED will be blinking in Mode 2 during the adding process.
-
Once the device has been successfully added into a Z-Wave® network, the LED will remain off. To confirm the inclusion of the device, press the S-button again; the green LED will blink once as a signal of successful inclusion.
Note! In Setting mode, the Device has a timeout of 10s before entering again into Normal mode.
Removing the Device from a Z-Wave® network (exclusion)
Removing (exclusion) with the S buttonSingle press and check if the green LED blinks once. If so, the Device is added to a Z-Wave® network.Enable add/remove mode on the gateway.To enter the Setting mode, press the S button (>0,5s) on the Device until the LED turns solid blue.Release and then press and hold (> 2s) the S button on the Device until the blue LED starts blinking in Mode 3. Releasing the S button will start the Learn mode. The blue LED will be blinking in Mode 2 during the removing process. The blue LED will be blinking in Mode 1 if the Device is successfully removed from a Z-Wave® network.
Factory reset
Factory reset generalAfter Factory reset, all custom parameters and stored values (kWh, associations, routings, etc.) will return to their default state. HOME ID and NODE ID assigned to the Device will be deleted. Use this reset procedure only when the gateway is missing or otherwise inoperable.
Factory reset with the S button
To enter the Setting mode, press the S button (>0,5s) on the Device until the LED turns solid blue.Press the S button until the LED turns solid red.Press and hold (> 2s) S button on the Device until the red LED starts blinking in Mode 3. Releasing the S button will start the factory reset.During factory reset, the LED will shortly turn solid green.The blue LED will be blinking in Mode 1 if the Factory reset is successful.
Remote factory reset with parameter with a gatewayFactory reset can be done remotely with the settings in Parameter No. 120.
Z-Wave® Security and Device Specific Key (DSK)
Click here to unhide/hide
Z-Wave® Security 2 and Device Specific Key (DSK)
The Device supports the latest Security 2 (S2) feature. S2 is handled by the strong AES 128 Encryption protocol, which means that the S2 makes Z-Wave® the most secure IoT (Internet of Things) security platform out there. To fully utilize the product and its Security 2 feature, a Security 2-enabled Z-Wave® gateway must be used.
Authenticated Control
The Device also supports Security 2 Authenticated, Unauthenticated, and Unsecure adding (inclusion).
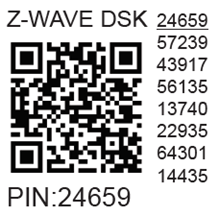
Note! When adding the Device to a Z-Wave® network with a gateway supporting Security 2 (S2), the PIN Code of the Z-Wave® Device Specific Key (DSK) is required. You can find it on the label on the side of the Device and a copy is inserted in the packaging, which must not be lost. Do not remove the Z-Wave® DSK label from the Device. As a backup measure, use the label in the packaging.
The first five digits of the key are highlighted or underlined to help the user identify the PIN Code part of the DSK text. The DSK is additionally represented with a QR Code as shown on the image.
Z-Wave® DSK label and QR code (example)
A joining node requesting to join the S2 Access Control Class or the S2 Authenticated Class will obfuscate its Public Key by setting the bytes 1..2 to zeros (0x00) before transferring its key via RF.
The DSK may be used for out-of-band (OOB) authentication.
ⓘ NOTE: This Device must be used in conjunction with a Security Enabled Z-Wave® gateway to fully utilize all implemented functions.
ⓘ NOTE: This Device is a security enabled Z-Wave Plus® product that can use encrypted Z-Wave Plus® messages to communicate to other security enabled Z-Wave Plus® products.
ⓘ NOTE: DSK access via UI gateways, which implement the S2 and SmartStart security feature, display an input dialog box, with a full or partial DSK key. Most of them display a partial DSK (they do not show the PIN code) when the Device is added with the S2-Authenticated security scheme. When added with the S2-Unauthenticated, some gateways show the complete DSK while others perform the complete adding (inclusion) process without prompting the user with the dialogue.
Z-Wave® Parameters
Click here to unhide/hide
Parameter No. 117 - Remote Device reboot
This parameter enable restarting or rebooting the Device without physical intervention. Use this parameter only for troubleshooting scope. After device reboot the parameter value will be set to default.
Values size: 1 Byte
Default value: 0
Values & descriptions:
-
0 - function inactive
-
1 - Remote device reboot
Parameter No. 120 - Factory ResetReset to factory default settings and removed from the Z-Wave network.The parameter is Advanced and may be hidden under the Advanced tag.Values size: 1 ByteDefault value: 0Values & descriptions:0 - No action1 - Factory reset
Parameter No. 155 - Illumination measurementThis parameter enables the ambient illumination measurement by the sensor.Value size: 1 ByteDefault value: 0Values & descriptions:0 - illumination measurement disabled1 - illumination measurement enabled
Parameter No. 156 - Tilting measurementThis parameter enables the tilting measurement by the sensor.Value size: 1 ByteDefault value: 0Values & descriptions:0 - Tilting measurement disabled1 - Tilting measurement enabled
Parameter No. 157 - Enable/Disable LED indicatorThis parameter enables/disables visualisation of LED indicator.Value size: 1 ByteDefault value: 0Values & descriptions:0 - LED indicator disabled1 - LED indicator enabled (The LED flashes with each state change)
Parameter No. 201 - Serial Number 1This parameter contains a part of device’s serial number.The parameter is Read-Only and cannot be changed.
The parameter is Advanced and may be hidden under the Advanced tag.Values size: 4 ByteDefault value: Device specificValues & descriptions:· 0x00000000 - 0x7FFFFFFF
Parameter No. 202 - Serial Number 2This parameter contains a part of device’s serial number.The parameter is Read-Only and cannot be changed.
The parameter is Advanced and may be hidden under the Advanced tag.Values size: 4 ByteDefault value: Device specificValues & descriptions:· 0x00000000 - 0x7FFFFFFF
Parameter No. 203 - Serial Number 3This parameter contains a part of device’s serial number.The parameter is Read-Only and cannot be changed.
The parameter is Advanced and may be hidden under the Advanced tag.Values size: 4 ByteDefault value: Device specificValues & descriptions:· 0x00000000 - 0x7FFFFFFF
Z-Wave® Command Classes
Click here to unhide/hide
-
ASSOCIATION_V2 [S0, S2]*
-
ASSOCIATION_GRP_INFO_V3 [S0, S2]*
-
BATTERY_V3 [S0, S2]*
-
CONFIGURATION_V4 [S0, S2]*
-
DEVICE_RESET_LOCALLY_V1 [S0, S2]*
-
FIRMWARE_UPDATE_MD_V5 [S0, S2]*
-
INDICATOR_V3 [S0, S2]*
-
MANUFACTURER_SPECIFIC_V2 [S0, S2]*
-
MULTI_CHANNEL_ASSOCIATION_V3 [S0, S2]*
-
NOTIFICATION_V8 [S0, S2]*
-
POWERLEVEL_V1 [S0, S2]*
-
SECURITY_V1
-
SECURITY_2_V1
-
SENSOR_MULTILEVEL_V11 [S0, S2]*
-
SUPERVISION_V1
-
TRANSPORT_SERVICE_V2
-
VERSION_V3 [S0, S2]*
-
WAKE_UP_V2 [S0, S2]*
-
ZWAVEPLUS_INFO_V2
Battery Command ClassThe Device use Battery Command Class to manage the reporting of the battery’s power level.With the use of a Battery Get command we can get a report, in percentage, of the battery’s power level. These values are from 0x00 to 0x64 in hexadecimal or in decimal, from 0 to 100.Low-Battery warningWhen the battery level is close to 0, the device will send an unsolicited / automatic report to the controller with a value 0xFF representing a low-battery warning.
Wake up Command ClassThis device goes to sleep mode to limit the power consumption of the battery. With the help of this command class the device lets the controller know when it is asleep and when did it Wake up. When the device is asleep it will not receive or process any commands sent to it.The Device wakes up on it’s own to report to the gateway, that it still alive. The default interval is 43200 seconds or 12 hours meaning the Device will wake up by itself twice a day.This interval can be set through the Wake Up Interval Set. The values that it will accept are between 0 and 86400 seconds (24 hours).
When the Device wakes up, it sends a Wake up notification to the gateway, letting it know it is awake and ready to receive commands.The Device will wake up when:Pressing the S buttonWhen the Device detects that the Door/Window was opened/closedWhen the Device is powered onBy the set wake up intervalWhen the device wakes up, it reset the interval timer and send a Wake Up Notification to the gateway, letting it know that it is awake. At that moment any commands that have been queued for execution will be sent to the device. Afterwards, when all commands are received by the device, the gateway will notify the Device that it may go to sleep again with a Wake Up No More Information command.
Supporting Command Class IndicatorThe Device supports the Command Class Indicator V3 (ID 0x50). When the Device receives an indicator set, the LED blinks according to the received indicator set.Refer to LED Signalization chapter.
Z-Wave® Notifications Command Class
Click to unhide/hide
Door/Window is open
-
Alarm type - 0x00
-
Alarm level - 0x00
-
Reserved - 0x00
-
Notification Status - 0xFF
-
Event - 0x16 (Door/Window is open)
-
Properties - 0x01
-
Event Parameters - 0x00 (Door/Window is NOT tilt and turn position)
Door/Window is tilt and turn open
-
Alarm type - 0x00
-
Alarm level - 0x00
-
Reserved - 0x00
-
Notification Status - 0xFF
-
Event - 0x16 (Door/Window is open)
-
Properties - 0x01
-
Event Parameters - 0x01 (Door/Window is in tilt and turn position)
Door/Window is closed
Z-Wave® Associations
Click to unhide/hide
Associations are used for direct communication between the Device and other devices within your Z-Wave network without the need of the Z-Wave gateway.
Max. number of associated devices per group is 9. This value is fixed and cannot be configured.
Each association group supports the association of up to 9 devices (nodes). To avoid network delays, we recommend limiting the number of associated devices to no more than 5 per group. "Lifeline group" is reserved for controlling devices, such as Gateways and remote controllers, or devices who can interpret the reports sent.Association group 1 – "Lifeline group" sends to the controlling device it's command class notifications and or command class reports when said command classes are triggered. Max. 9 nodes are allowed:
Root device
Root device - Association Group 1 - Lifeline
-
INDICATOR_REPORT : LED status
-
DEVICE_RESET_LOCALLY_NOTIFICATION : triggered upon request
-
BATTERY_REPORT : This command MUST be issued periodically to report the current battery level. The frequency is up to the implementation
-
BATTERY_REPORT : "This command MUST be issued by a node when its battery becomes low and the end user needs to reload or replace the battery. The Battery Level field MUST be set to 0xFF to indicate a low battery warning."
-
SENSOR_MULTILEVEL_REPORT : angle
-
SENSOR_MULTILEVEL_REPORT : Illumination
-
NOTIFICATION_REPORT : Triggered when Reed Switch is opened or closed
Root device - Association Group 2 (*not available for Long Range inclusion)
Association Group 2
Allowed nodes: 9
It is assigned to Reed Switch (uses Basic command class).
Triggered by Reed Switch. Supports the following command classes:
-
BASIC_SET : set On / Off state to associated devices
Disclaimers and Warnings
READ BEFORE USE
This document contains important technical and safety information about the Device, its safe use and installation.
Click to unhide/hide
⚠CAUTION! Keep the Device away from liquids and moisture. The Device shouldn't be used in places with high humidity.⚠CAUTION! Do not use the Device if it has been damaged!⚠CAUTION! Do not attempt to service or repair the Device yourself! ⚠CAUTION! The Device may be connected wirelessly and may control electric circuits and appliances. Proceed with caution! Irresponsible use of the Device may lead to malfunction, danger to your life or violation of the law.⚠RECOMMENDATION: Place the Device as far away as possible from metal elements as they can cause signal interference. ⚠WARNING! Do not allow children to play with the magnets. Even relatively small magnets can cause serious injury if swallowed.
⚠WARNING! Even used batteries may cause severe injury or death. Call a local poison control center for treatment information! ⚠WARNING! Do not force discharge, recharge, disassemble, heat above manufacturer’s specified temperature rating or incinerate! Doing so may result in injury due to venting, leakage or explosion resulting in chemical burns. ⚠WARNING! Do not recharge non-rechargeable batteries!
⚠CAUTION! Remove and immediately recycle or dispose of exhausted batteries according to your local regulations! ⚠CAUTION! If the Device is not used for an extended period, remove the battery. Reuse it if it still has power or dispose of it according to local regulations if it is exhausted. ⚠CAUTION! Do not dispose of batteries in household trash or incinerate! Batteries can emit hazardous compounds or cause fire if not disposed of properly. ⚠CAUTION! Ensure the batteries are installed correctly according to polarity (+ and -).
⚠CAUTION! Use only 3 V CR2032 or a compatible battery! ⚠CAUTION! Always completely secure the battery compartment! If the battery compartment does not close securely, stop using the product, remove the batteries, and keep them away from children.
Z-Wave® Important disclaimer
Z-wave® wireless communication may not always be 100% reliable. This Device should not be used in situations in which life and/or valuables are solely dependent on its functioning. If the Device is not recognized by your gateway or appears incorrectly, you may need to change the Device type manually and ensure that your gateway supports Z-wave Plus® multi-channel devices and Z-wave® Long Range capability in case of Long Range devices.
Compatibility
| Wave Door/ Window | functions - reports |
| Gateway | Sensor 1 | Sensor 2 | Sensor 3 | Notes |
| Home Assistant |  | | |
|
| Fibaro - HC 3 / Wave engine 3 | | | |
|
| Homey | | | |
|
| Homee Gen 7 | | | |
|
| Homee Gen 5 | ❌ | ❌ | ❌ |
|
| Smart Things | | ❌ | ❌ |
|
| Vera Ezlo | TBD | TBD | TBD |
|
| Cozify | TBD | TBD | TBD |
|
| Notes | Sensor 1: Open / Close
Sensor 2: Luminosity
Sensor 3: Inclination |
|
|
| Function | Meaning / tested |
| On/Off | if device respond to the app UI On/Off command |
| SW On/Off | if device reports On/Off changes by SW input |
| Dimming | if device respond to app UI dimming command |
| SW Dimming | if device report dimming state change by SW input |
| Watts | if Watts are reported (unsolicited) |
| kWh | if kWh are reported (unsolicited) |
| Up/Down | if device respond to the app UI Up/Down command |
| SW Up/Down | if device reports Up/Down changes by SW input |
| Slats | if the slats respond to the app UI command |
| SW Slats | if the slats report the changes done by SW |
| D control | detached mode if device reports scene commands single press, double press,… |
| D Binary | detached mode if the device reports binary On/Off by SW input |
| Sensor # | Is the sensor report visualized in the gateway, type of sensor in the notes. |
| Legend |
| Symbol | State |
| | Working / Possible |
| ❌ | Not Working / Not Possible |
| P | Partially |
| N/T | Not Tested |
| TBD | To be done |
Compliance
Hereby, Shelly Europe Ltd. declares that the radio equipment type Shelly Wave Door/Window is in compliance with Directive 2014/53/ EU, 2014/35/EU, 2014/30/EU, 2011/65/EU. The full text of the EU declaration of conformity is available at the following internet address: https://shelly.link/ShellyWaveDoor/Window_LR-DoC
Disposal & Recycling
Do not dispose of the product in household waste. Recycle the product to prevent environmental and health damage and to promote resource conservation. Dispose of the product at an appropriate waste collection point at your own responsibility.
Resellers, from which the Device was purchased are required to accept Waste Electrical and Electronic Equipment (WEEE) free of charge for proper disposal.
Some electronic products may store personal data. The user is responsible for deleting this data before disposing of the Device. For deletion reset the Device to its factory settings.
Compliance archive
Printed User Guide
WEB links
Troubleshooting
Troubleshooting Guides
Gateway guides
You may find useful guides on gateways in the Z-Wave Z-Wave Gateways
Firmware
Latest firmware updates:
Stay Updated with the Firmware Releases for Shelly Wave Devices
all firmware updates:
GitHub - Shelly Wave FW OTA files
Integration
All shelly devices:
Discover Compatible Gateways for our Devices
Webpages
Product page
https://www.shelly.com/collections/all-products?sort_by=manual&filter.p.m.custom.filter_technology=Z-Wave&filter.v.price.gte=&filter.v.price.lte=
Manufacturer
Shelly Europe Ltd.
Address: Shelly Europe ltd, 51 Cherni Vrah Blvd., building 3, floor 2 and 3, Lozenetz Region, Sofia 1407, Republic of Bulgaria
Tel.: +359 2 988 7435
E-mail: zwave-shelly@shelly.cloud
Support: https://support.shelly.cloud/
Web: https://www.shelly.com
Changes in the contact data are published by the Manufacturer at the official website: https://www.shelly.com
Legal Notice
This User Guide is subject to change and improvement without notice. Shelly Wave reserves all rights to revise and update all documentation without any obligation to notify any individual or entity.